When it comes to image SEO, I’m sure you’ve heard enough about filenames and ALT tags for an entire lifetime.
If you’re looking for some practical strategies you can use on your site today to rank better in Google Image Search, then you’ll love this infographic.
It’s a simple checklist (along with detailed instructions) that will show you step-by-step how to dominate the webs number two search engine.
You’re about to learn twenty-one image optimization strategies in this complete image optimization guide, revised and updated for 2021.
I’m covering everything from image metadata and filenames to advanced image SEO tips like Exif data, Schema, and image sitemaps.
Let’s begin.
Bonus: Download a free checklist that will show you how to quickly leverage these strategies. Includes 2 bonus tips not found in this post.
Article Summary
- Image SEO is no longer about filenames and alt text alone
- Google now evaluates images based on context, relevance, and intent
- Images contribute to visibility across web search, image search, and AI results
- Poorly optimized images slow sites down and hurt user experience
- Strong image SEO supports accessibility, discoverability, and conversions
- Visual assets are becoming ranking and trust signals, not just design elements
- Image optimization is a core part of Search Everywhere Optimization™, not a standalone task

Now you know the steps you must follow to rank in Google Images, here’s precisely how you put each image SEO tip into practice:
1. Find KILLER Image SEO Keywords with This Google Images Tool
I’m not exaggerating when I say without keywords, there’s no such thing as image SEO.
Yet, almost EVERYONE ignores image keyword research.
This is a HUGE mistake!
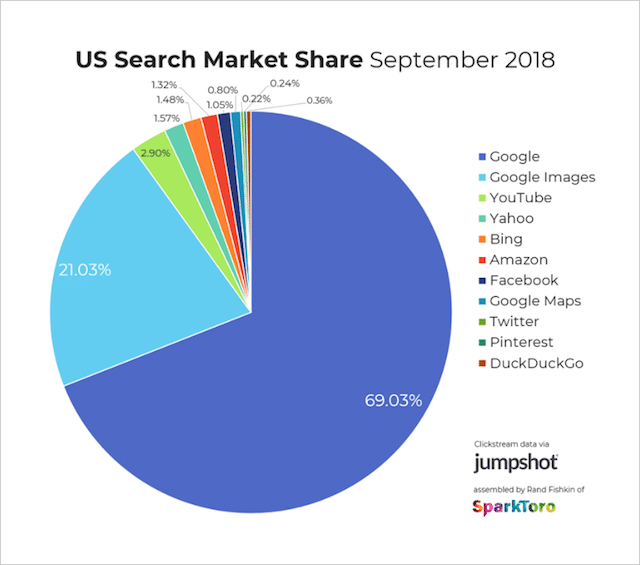
Google Images accounts for 21% of total search volume, not just on Google, but on the entire World Wide Web.
Which means:
If you can master the art of identifying high-volume search terms for your images, you’ll not only benefit from A LOT MORE search engine traffic, but you’ll move ahead of your competitors who skip this important first step.
The (Smart) Way to Choose Image SEO Keywords
Chances are your current approach is something like this:
Step 1 – Spend hours agonizing over web search data to identify a keyword list for your page or post.
Step 2 – 30 seconds to haphazardly pick keywords from your list (ignoring image search stats) before adding those keywords to your image ALT tags.
Step 3 – Cross your fingers and hope those keywords get some amount of search volume in Google images and (by complete-and-utter-luck) you pick up a tiny trickle of image search traffic.
And, that’s if you remembered image search at all – you probably didn’t.
From now on, I want you to think about keyword selection for image SEO differently.
Instead of just choosing from your main content keywords…
Treat your images as standalone pieces of content with their own target search term(s).

How to Select Keywords for Image SEO
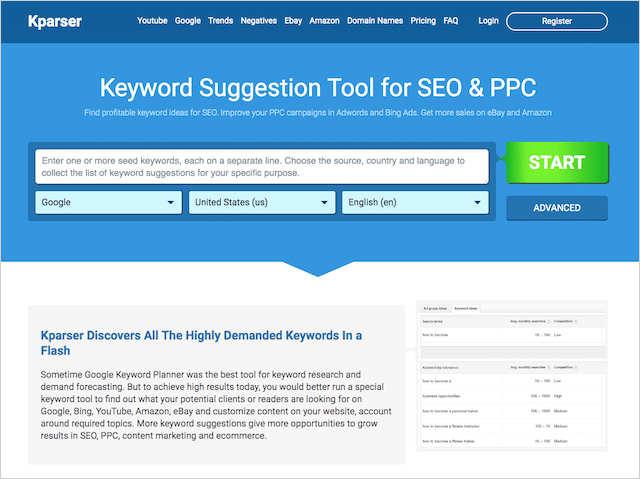
Use the Kparser keyword tool to get keyword suggestions specific to Google Images.
Other keyword research tools focus mainly on Google web-search, YouTube, and Amazon search engines.
Kparser includes “Google Images” in its options too:
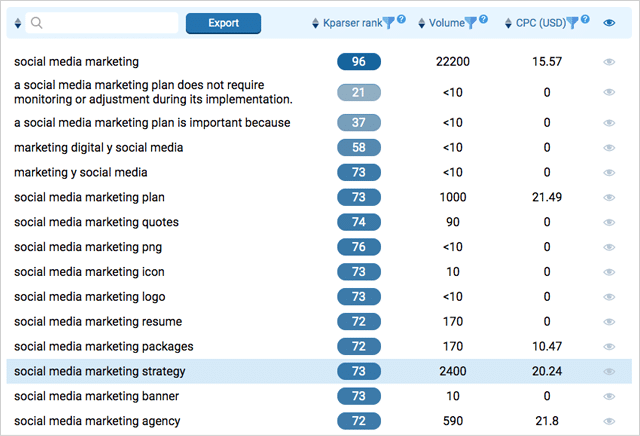
To find relevant keywords using Kparser, begin with a broad “seed” keyword.
Here’s what I got when I plugged “social media” in as my seed term:
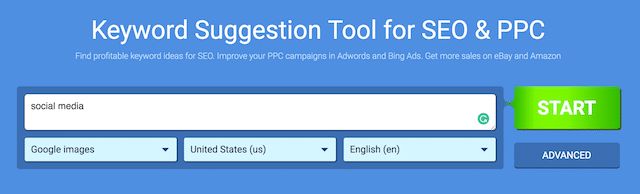
The search returned 1,050 keyword suggestions, not bad!

Kparser groups suggestions into topical categories, which means you can zero-in on the most relevant category with ease.
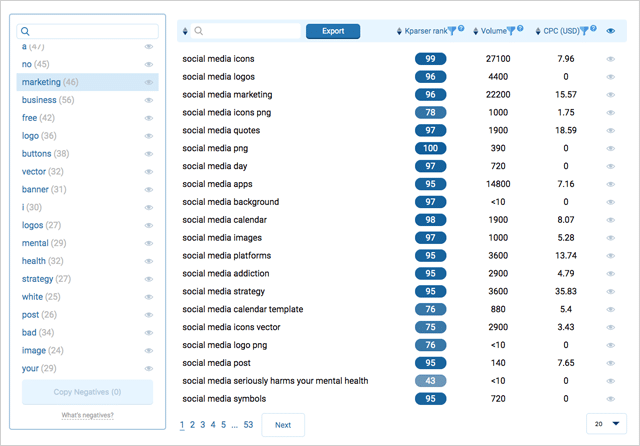
All you need to do next is to pick a relevant keyword (with high search volume), and you’re done.
A short word of advice:
I don’t recommend keyword research for EVERY single image on your site – unless you’ve got a boatload of time on your hands.
Instead, focus your efforts on your most important images.
(The ones you REALLY want to be shown in image search).
Then, to help your overall content rank better, use your main page/post keywords to optimize the rest.
I’ll show you how to do that later.
But for now, just note down 1-5 keywords that closely relate to your content.
Then move on to step #2…
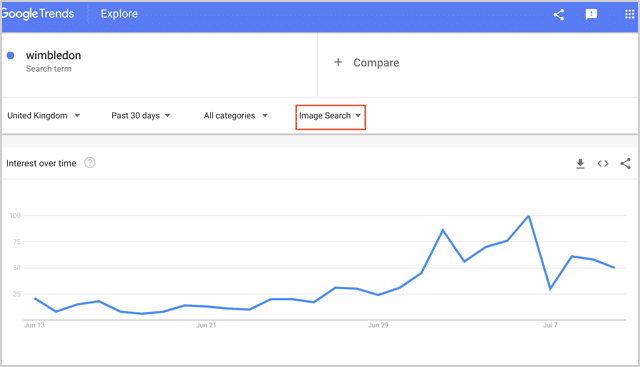
PRO TIP:
You can use the ‘Image Search’ filter in Google Trends to discover image search queries with growing interest over time. Piggyback rising image search trends by creating infographics – and other image assets – optimized for these hot keyword searches.
2. Drive Higher CTR (And Rankings) With Stand Out Images
We’ve all seen websites filled with stock photos:
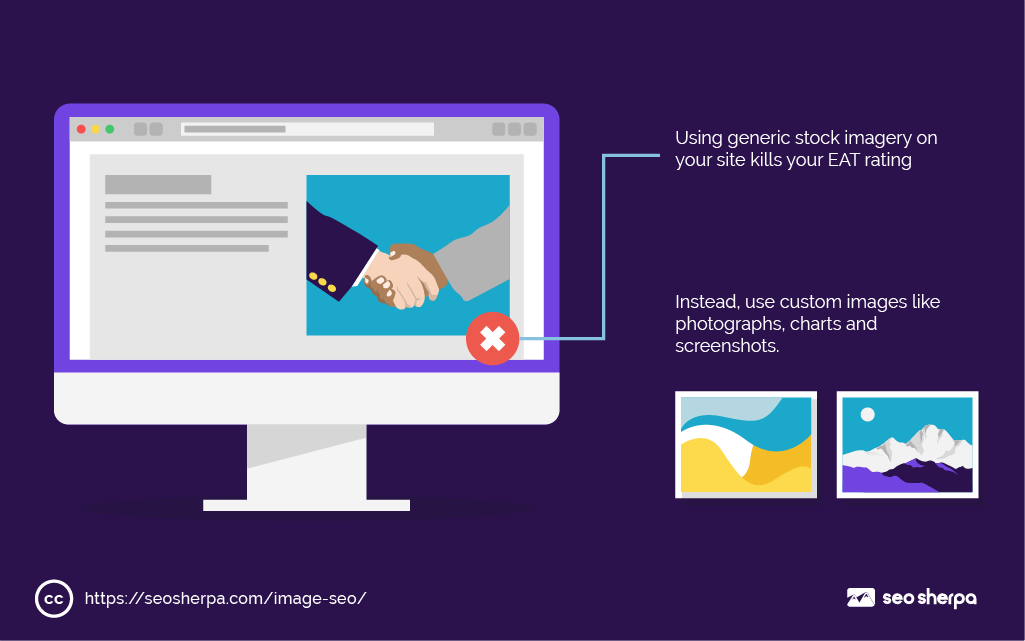
And they suck real bad.
Using generic stock images on your site kills your EAT rating (Expertise Authority and Trust) which has a huge impact on rankings these days.
Not only that…
If you use the same stock images that hundreds of other websites use… guess what?
You’ll compete against every single one of those websites in Google Images search.
Why You Need to Become a Jedi of Image CTR
Thanks to innovations in Google’s machine learning algorithm (AKA RankBrain)…
Images that win higher engagement (such as scrolls and clicks) get moved up in the rankings.
Whilst images with lower engagement get moved down.
In other words:
To rank high-up in Google Images search – you need images that STAND OUT!
The key to creating “stand out” images that win more attention and clicks is this:
Identify what already ranks, then create something completely different.
This is a simple 3-step process.
1) Check the search results for your target keyword(s).
2) Note down what’s there.
3) Do the opposite.
For example:
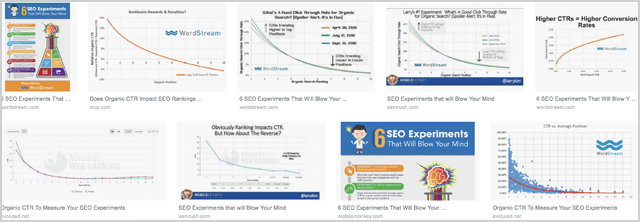
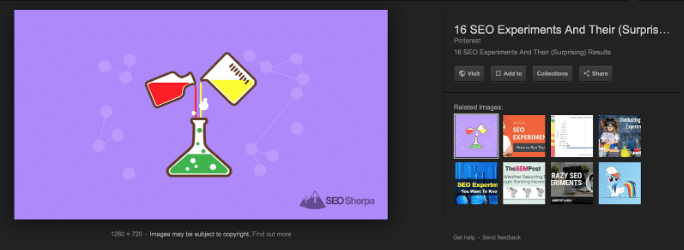
A few years ago I sat down to write a piece of content optimized around the term “seo experiments”.
And I noticed the image results were littered with screenshots and diagrams.
Now:
I too could have used a light-coloured screen grab or diagram to illustrate my post.
But that wouldn’t make any sense.
Instead, I created something totally different.
Specifically, a custom illustration with a bright-coloured background:
And because my image stands out from everything else.

It ranks consistently for this term.
3. JPG, PNG, or GIF: Getting Your Image File Type Right
People often choose the wrong file extension for their images.
Which results in poor quality or huge file sizes.
Or worst still, BOTH!
But not you…
You know that choosing the right file type will keep your images looking clear.
And won’t sacrifice load time which is critical for SEO.
Here’s how to choose the best image file format:
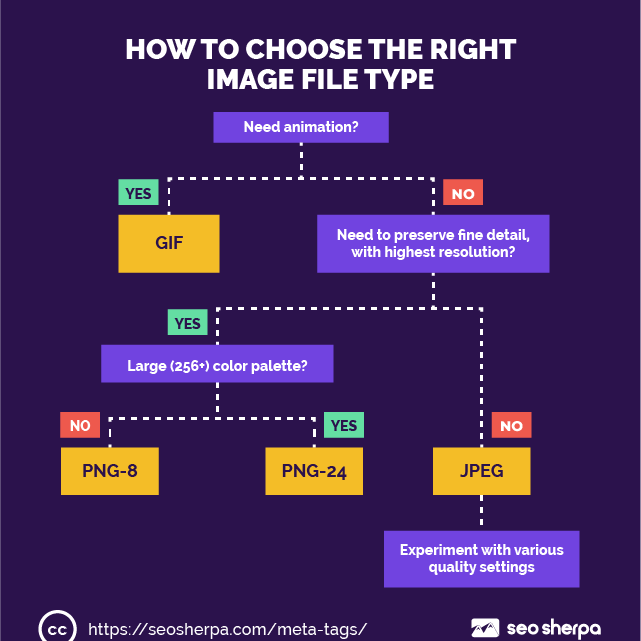
In summary:
GIF – Good for a short animation. Also OK for flat images with no gradients. Bad for small images inside a screenshot like a profile picture or a gradient like the top bar of a browser.
PNG – Good for screenshots of apps and websites with gradients. It keeps text looking clean, but can be problematic for file sizes.
JPEG – Good for photos of people, places, or things. Bad for screenshots of apps and websites or text.
Once you’ve picked the appropriate file type for your image…
Open your image in your favorite image editing software, click export, save as, and you’re set!
4. Resize Your Images to “Optimum” Proportions (And Slash Page Bloat)
The page you are on right now has a content area width of 640px.
Which means:
The largest image size that will ever be shown is 640 pixels wide.
If I were to upload an image even 1px wider, it’d be a waste.
Larger than necessary images add extra weight to a page and slow down the site.
(Which is a bad thing for SEO)
What’s more:
In addition to loading the larger image, my CMS will need to format and edit the image to fit the dimensions of the page…

Slowing my page load time even more.
Back to you:
Instead of just loading your image, leaving your website’s CMS to reformat it…
Reformat your image before you upload.
There are plenty of tools available to edit your images outside of WordPress.
Here are a few:
- Pixlr – A free online tool that works great for minor formatting.
- Preview – Standard on all Macs and has everything you need for basic image editing.
- ImageOptim – A free tool for Mac that has “save for web” features.
- RIOT – A free image optimizer for Windows.
- Photoshop – This is what I use. I like it because of its “save for web” option, which helps me keep file sizes low without losing quality.
Each of these tools allows you to edit the image size in pixels.
You want to resize the image to the exact width of the space you want to put it in.
For our posts, our column is 640px wide.
So that’s EXACTLY the size I make the images.
With that, on to step #5.
5. Image Filenames for SEO: Seven Actionable Tips
Let’s face it:
Google has advanced a lot through machine learning.
But, its ability to recognise simple objects is far from perfect:
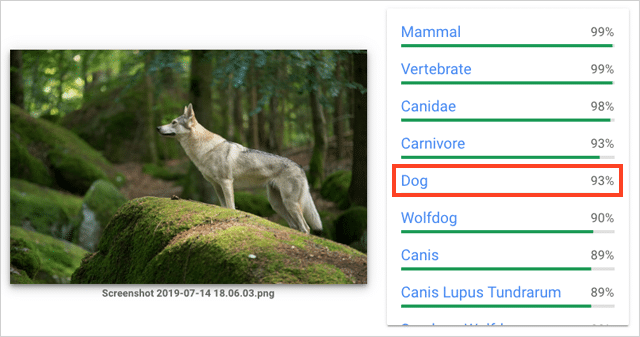
(Google believes this is a dog, but it’s a wolf).
When I tested several images using Google Cloud Vision (the technology that powers image recognition in Google Search), here’s what I learned:
Google is wrong a lot of the time.
While image recognition is getting better, search engines still need a helping hand.
That’s why I recommend you to use a custom descriptive filename for your image(s).
Whereas a default file name like DSC_14560.JPG tells search engines NOTHING!
A custom filename that describes the image’s subject, indicates precisely what the image is about.
And, in turn, tells search engines what to rank your image(s) for.
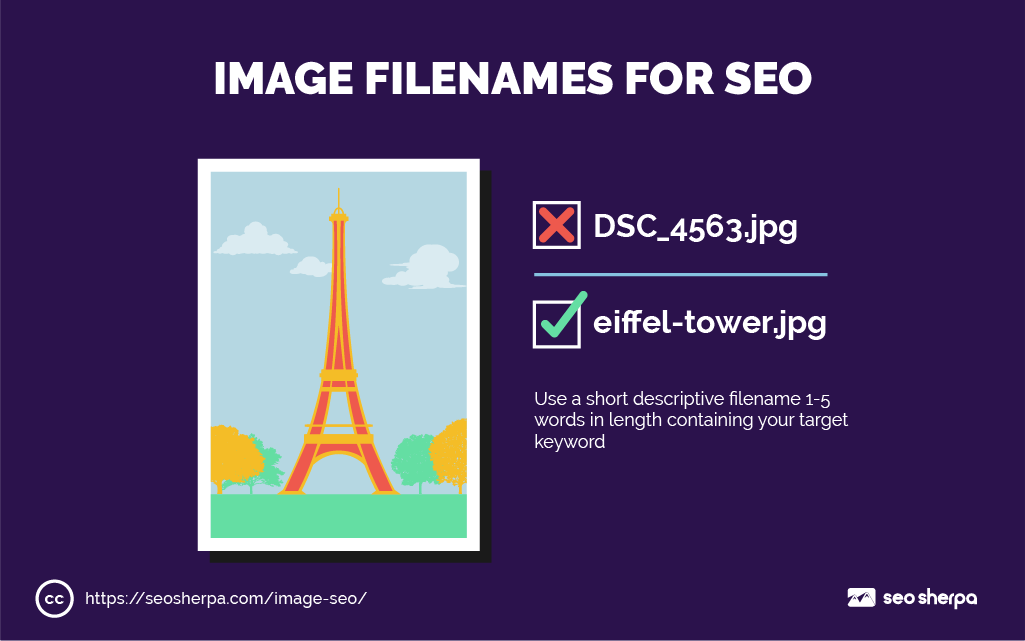
When deciding on a filename, choose a name that does these three things;
1) Describes the image.
2) Includes your target keyword (refer to step #1).
3) Is 1-5 words long.
Once you’ve chosen your filename, use “file > save as” on PC, or the “Command > i” function on Mac to rename your file.
Then, click SAVE and you’re done.
BONUS: FOUR PRO TIPS
- Use hyphens to separate words in your file name. Hyphens are preferred by Google over underscores.
- Remove stop words like; in, at, the, i, and, we as these are largely ignored by search engines. Check this handy list of stop words to ignore by Jacob Stoops for reference.
- Place your keyword at the start of the filename. If you are targeting the keyword “Eiffel Tower” then “eiffel-tower-night.jpg” is much better than “night-view-eiffel-tower.jpg”
- Be careful not to stuff your filename with keywords. Your filename should actually describe what’s in the image itself.
Now that image renaming is complete, it’s time for step number 6.
6. Decrease the File Size of Your Images for Faster Load Times
So you’ve chosen the right file type and you’ve resized your image.
Is that it?
Not quite…
The final step before uploading your image is to decrease the weight of your file – you want it as light as possible.
Lighter images mean a faster website.
And a faster website means higher rankings.
To reduce the weight of your images, compress the image file.
In short:
Strip out all the unnecessary bloat from the file while maintaining as much quality as possible.
Take a look at these two images:
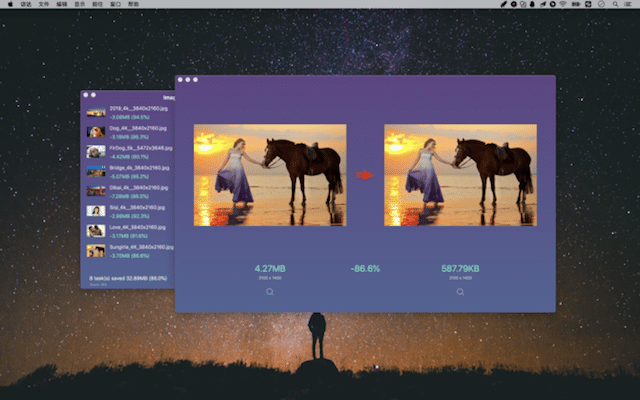
Both of these images have the same dimensions.
They are both the same file type (.jpg).
But:
One image is 86% lighter in weight than the other.
It’s because the image on the right has been compressed.
Don’t worry about the technicalities – there are several tools that compress images (quickly and easily) for you. Here are a few:
- ImageOptim – Google’s recommended tool.
- JPEG Optimizer
- Optimizilla
- Kraken.io
- Compressnow
- Trimage
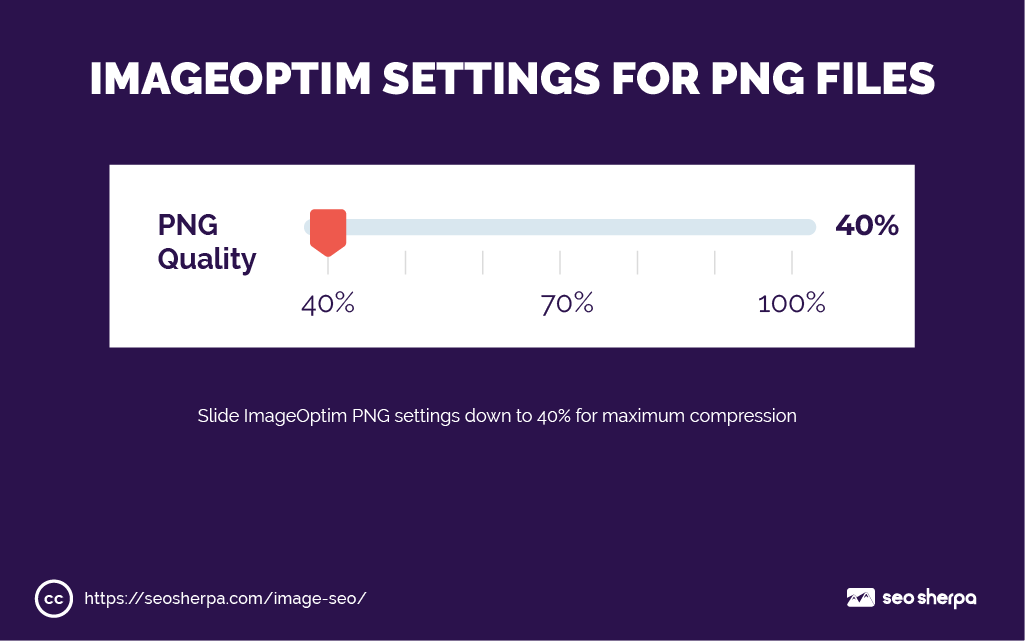
Of all these tools ImageOptim performs best.
It’s significantly better by default at compressing JPEGs than the other tools.
And, with one small change to its settings, it performs best for PNG compression too:
Give it a try.
Your images will load much faster.
7. Image ALT Text (ALT Tags) and How to Optimize Them for Better Image SEO
If you’ve ever wondered how to tag images for SEO, I’m now going to show you.
First up, the basics;
The image ALT tag, also known as “ALT text,” “ALT description,” and “ALT attribute” is the alternative text that appears in place of an image when an image fails to load on the screen.
The ALT is the same text screen-reading tools used to describe an image on a page.
Its primary purpose is to help people with limited eyesight.
But, since Google’s Bots also has limited “eyesight” – it helps them a lot too.
Computer vision algorithms aside, when a search engine robot “views” an image, pretty much all it can see is the filename.
When you add alternative text to your code…
You give search engines WAY more to go on to understand the content (photo/screenshot/graphic) displayed on the image file.
Here’s how the ALT text will show up in your HTML code…
Image ALT text example:
<img src=”kangaroo.jpg” alt=”Skippy kangaroo jumping“/>
Use the ALT text to describe your image.
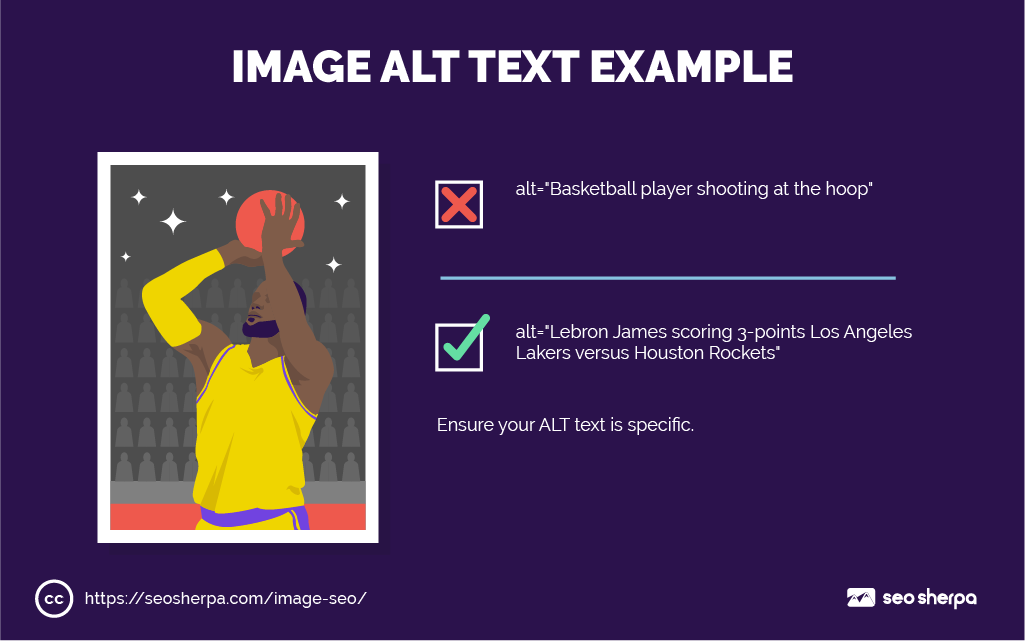
Image ALT Text Best Practices
1) Start by asking yourself, what information would be useful to someone who cannot view this image?
2) With your answer in mind, finish this sentence “This is a(n) image, screenshot, photograph or drawing of __________.”
3) Remove any conjunctions or connections (e.g., a/an) from the resulting sentence and use the last part as your ALT text.
4) Ensure your resulting description is specific;
BONUS TIP – If you have an e-commerce site I recommend using your product numbers in your ALT tags. Qualified buyers often search in Google Images using product IDs.
5) Include your target keyword in your ALT text towards the beginning of the tag.
6) Keep your ALT text less than 125 characters – Screen-reading tools stop reading ALT text around this point – search engines may do too.
But wait!
What if you’ve already loaded your images to your site?
What do you do then?
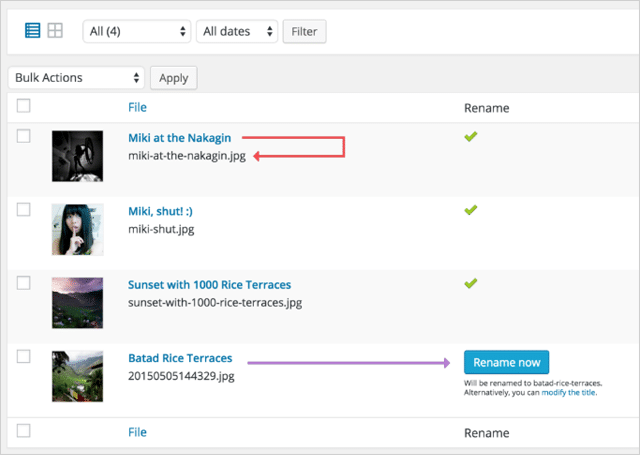
Use the WordPress image file renamer plugin, to update your image filenames inside WordPress.
With just a few clicks you can save your images with optimized “image SEO-friendly” filenames.
Nice!
8. Leverage Image Title Attributes and Captions for Higher Rankings
These are two important (but often overlooked) elements of image SEO.
We know they’re important because Google says so in their Image Best Practices guide:
“Google extracts information about the subject matter of the image from the content of the page, including captions and image titles. Wherever possible, make sure images are placed near relevant text and on pages that are relevant to the image subject matter.”
They’re important to readers too.
Check this!
A KissMetrics study found that:
“Captions under images are read on average 300% more than the body copy itself.”
This means they keep users on your page longer and create RankBrain-centric usability signals that are essential to higher rankings in modern-day SEO.
Image title tags provide valuable information to readers as well.
Just hover your mouse over an image (with the image title tag filled in), and you’ll see the title pop right up as a tooltip:

Pretty cool.
So clearly, not using Image Title attributes and Captions, or not using them correctly, means missing out on opportunities to engage and inform readers and search engines.
Optimizing Your Image Title Tag
For the Image Title Tag, use a short, descriptive, catchy title that complements the ALT text, and you’re good to go.
For example…
If your ALT text is “Skippy kangaroo jumping” your title could simply be “Skippy The Bush Kangaroo”
Dead simple!
Writing Your Image Captions Right
Whereas the title should provide a relevant description of the image…
If a caption simply describes the visuals in the photo, it’s pretty much useless.
Instead, describe details of the photo that are not obvious, things like;
- The location.
- The time of day or year.
- Or, a specific event that is taking place.
This will give readers (and search engines) more context about your image – and potentially help it rank for more keywords.
For bonus points, sprinkle some LSI keywords into your caption as well.
Putting these tips into practice:
If you have a photo of a sunset, the wrong way to caption the photo would be as “a sunset” – this would not add ANY additional information that would benefit readers or search engines.
In contrast, the right way to caption your sunset photo might be:
Moonrise and Sunset, February 2019, Houses of Parliament, London, England.
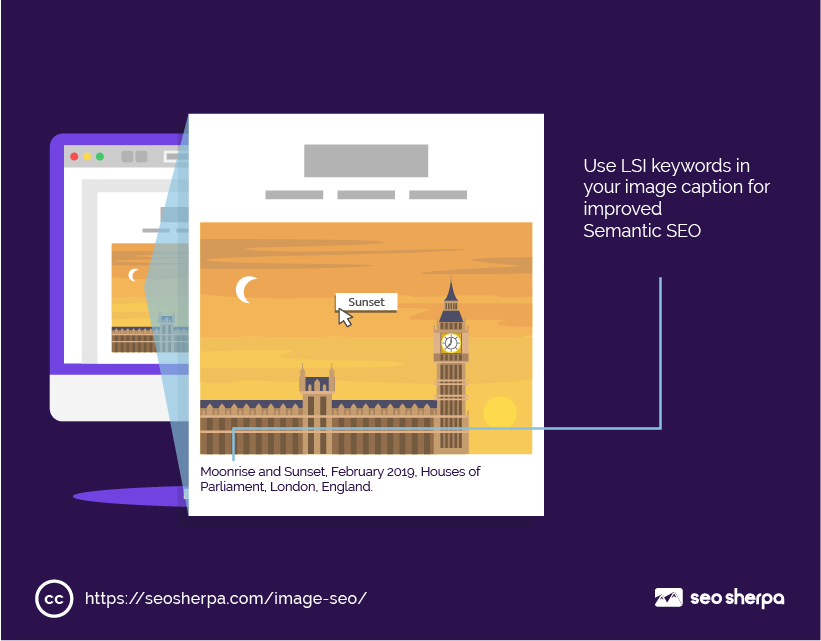
This BETTER example includes an LSI keyword and more information that explains the content of the image to users and search engines.
Voila!
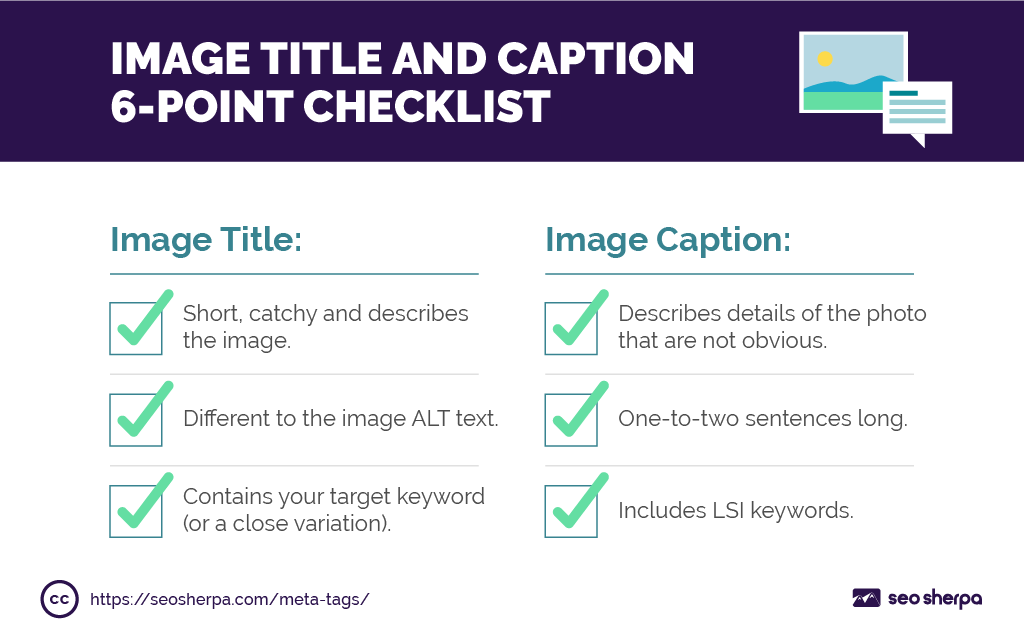
Image Title and Caption 6-Point Checklist
Image Title:
- Short, catchy and describes the image.
- Different to the image ALT text.
- Contains your target keyword (or a close variation).
Image Caption:
- Describes details of the photo that are not obvious.
- One-to-two sentences long.
- Includes LSI keywords.
9. Optimize The Page Your Image Sits On
OK, so you’ve optimized your image file and tags.
Now it’s time to optimize the content around your image.
Here’s how:
First, update your Page Title to include the keyword you are targeting.
Do this to the page your image sits on.
Next, amend the page’s URL to include your target keyword (or a close variation).
You want short, keyword-rich URLs.
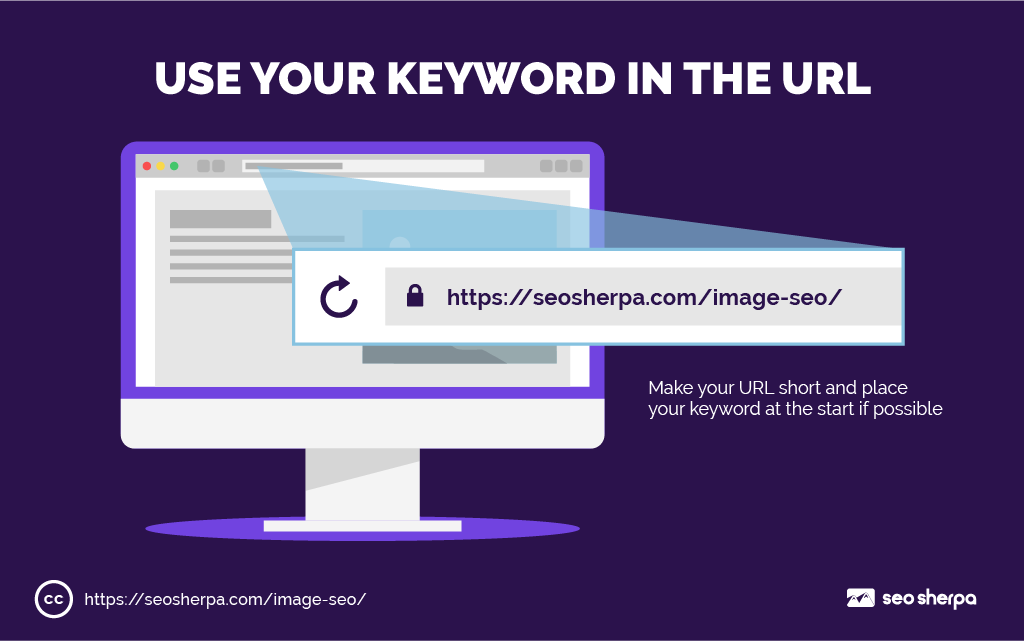
Short URLs crush long URLs.
Then, surround your image with relevant text that supports the image content.
What’s important here is context.
If your image is “blue-bananas.png”
And, your file is sandwiched between two paragraphs talking about blue bananas…
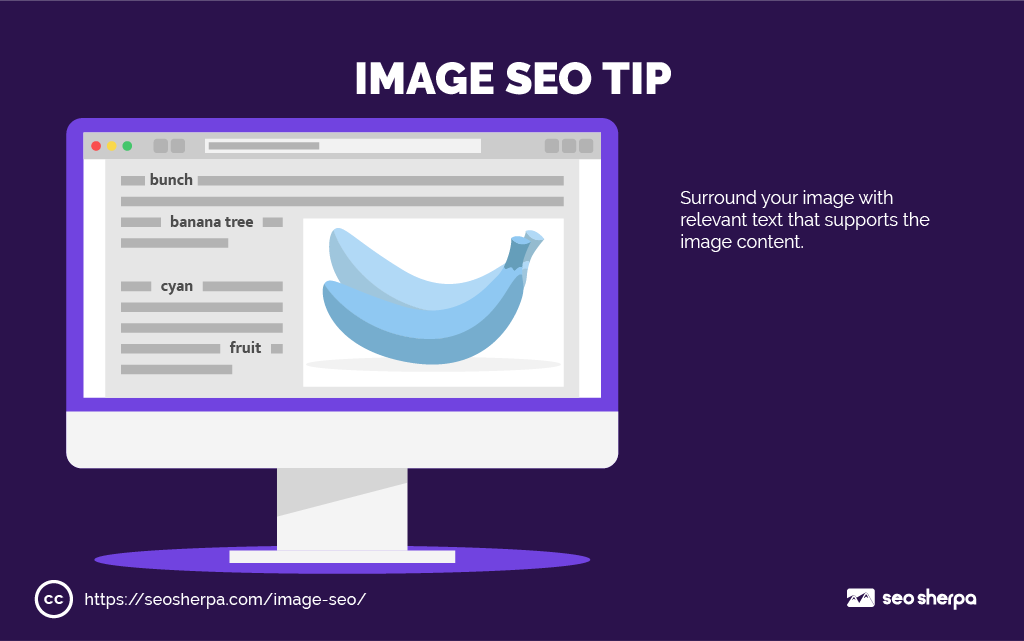
Google can be damn sure that “blue-bananas.png” really is a picture of blue bananas.
To give Google the most context possible, leverage:
Semantic SEO
Semantic SEO is the process of building more “meaning” into your content.
In other words:
Using related keywords that support the “context” of your main keyword.
Here’s how:
First, pop your target keyword into Google Images.
Google will give you words and phrases they consider to be closely related to that topic:
Second, type the same keyword into a normal Google search. And scroll down to the “Searches related to…” section.

Finally, sprinkle some of those terms into the content around your image.
And you’re set.
10. Create an Image Sitemap and Get Your Images Indexed Faster
Sitemaps help get your content indexed quickly.
And help deeper content get found.
If you have many images on your site, an image sitemap can ensure more of those get shown in image search results.
You can generate a standalone image sitemap.
Or, do what I recommend…
And, include images in your regular XML sitemap.
The good news?
If you use WordPress and Yoast SEO plugin, images get added to your XML sitemap automatically.
Here’s a basic XML sitemap:

And here’s one with images added:
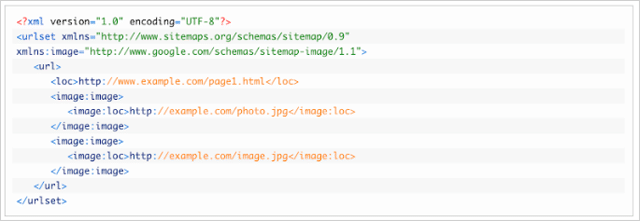
You’ll see that <image:image> and <image:loc> tags have been added.
There are other tags that can be included too.
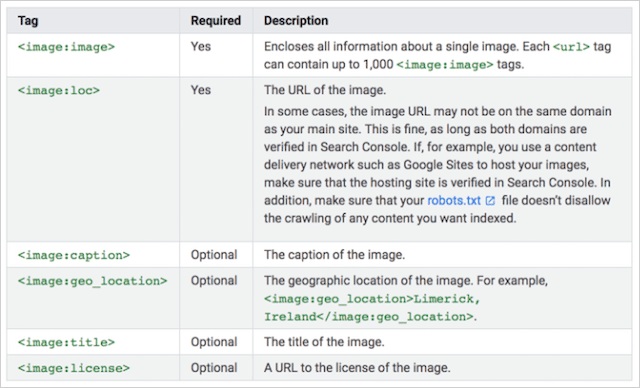
Adding these other tags can feed even more information to search engines, but since we’ve already optimized our images, they’re certainly not required.
My recommendation:
Simply install the Yoast SEO plugin and leave it at that!
11. SVGs: How (And When) to Use Scalable Vector Graphics: The Image SEO Secret Weapon
SVGs are the most underutilised file type in all of image SEO.
When you consider how well they perform…
You’ll be stunned they’re not THE “go-to” file for graphics on the web.
Just see how they compare to other image file types:

SVGs are lighter, faster loading and scale WAY better than both JPEGs and PNGs.
What’s their secret?
SVGs are not really imaging files.
SVGs are vector graphics and they’re based on the XML markup language.
What that means is SVGs are part of your HTML code.
(Unlike JPEG, GIF, and PNG which are files that sit on a server).
The short of it all:
Because SVGs are code, they can be animated.
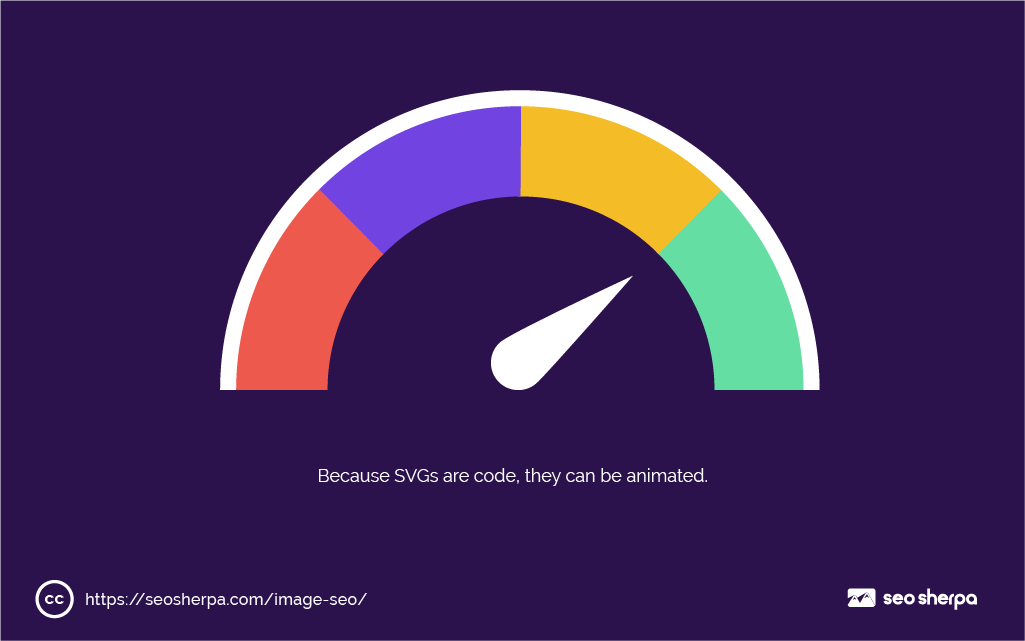
And, they scale to ANY size with ZERO loss of quality.
But, most importantly for SEO:
A web browser loads SVG code instantly.
Whereas, for JPEG, PNG, and GIF, a browser has to request the image file from an external server, fetch it back and then render it on the page.
Each request by the browser adds time to the page load.
And, as you know, when it comes to search engine rankings…
Fast loading pages trump slow loading pages every time.
How to Create SVGs
Unless you’re an Adobe Illustrator whizz…
I recommend you use an online tool that converts image files to vectors.
But, beware:
Some tools do not actually convert the image file to an SVG (which requires the image to be re-traced into a set of coordinates and lines), but instead just encodes the image into the XML code.
This is NOT what you want.
The best online tool I’ve found for converting images to SVG properly is Vector Magic.

Vector Magic actually traces the image and plots it into an SVG.
Simply upload your JPEG or PNG at vectormagic.com and leave Vector Magic to do its thing.
Once it’s finished, you can compare your new SVG to the original file.
If you’re happy, download the SVG and “hey presto” you’re done.
Scalable Vector Graphics Checklist:
SVGs are not the right solution for everything, but for certain types of graphics, they really kick ass. Here’s a list:
Good For:
- Plain illustrations and diagrams
- Logos and icons
- Animations
- Interactive charts, graphs, infographics and maps
- Special effects
Bad For:
- Everything else
Now we’ve covered SVGs, it’s time for our next advanced image SEO tip.
12. EXIF Data Optimization
When it comes to EXIF data, there are two things I recommend you do:
Thing #1: Strip out ALL unnecessary EXIF data (so your image is lighter and loads faster).
Thing #2: Tag up your image with relevant EXIF data that’s useful for SEO.
But first…
What is EXIF data?
Here’s what Wikipedia says:
“An exchangeable image file format is a standard that specifies the formats for images, sound, and ancillary tags used by digital cameras, scanners and other systems handling image and sound files recorded by digital cameras.”
In other words…
They are tags used to embed information about an image in its file.
Information like:
- Camera make and model
- Exposure
- White balance
- Lens info
- Creation date
There are literally hundreds of things EXIF data can define, but most (like these) are pretty much useless for SEO.
So, what EXIF data tags are useful?
Just a few:
GPS tags – These define where the image was taken providing location information that might help with local SEO. If you have a location-based business, tag your image with the GPS coordinates of your premises.
Owner Name – Add your brand name (or your own name) here because it may influence the image being shown when someone searches your brand in Google Images.
Image Description – Just like an ALT description, the EXIF image description tag can provide information pertaining to what the content of the image is about. Simply use this tag to describe your image.
How to Optimize EXIF Data for Image SEO
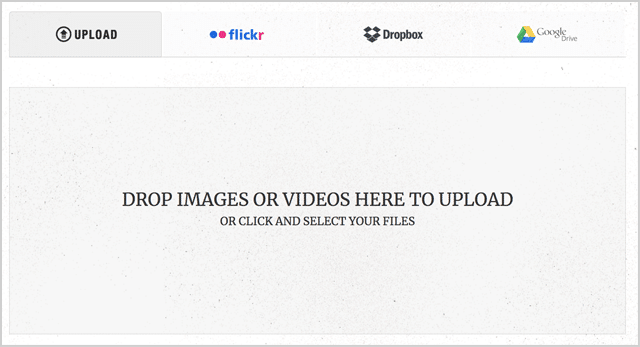
First, upload your image to exifer.net:
Then clean the image of all EXIF data by ticking this box:

Next, search the GPS location you want to tag your image to:

Fill out the Owner Name and Image Description fields.
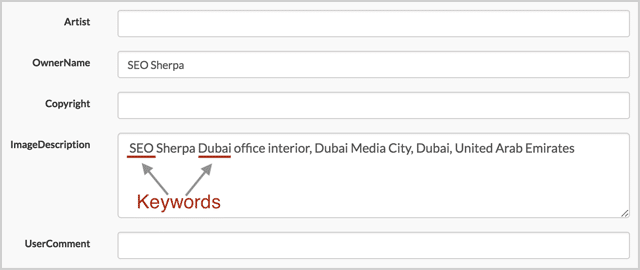
Remembering to include your keywords.
(Since I’m optimizing for the term “SEO Dubai” I’ve included the keywords “SEO” and “Dubai” in my image description)
Then click Go.Exifing.
And, with that, you’re done.
Note From James:
There is some debate about whether Google really uses EXIF data (or not)…
Google has stated they “may use it as a ranking factor” in the past:
And, in previous versions of Google Images, they even displayed EXIF data in the SERP:
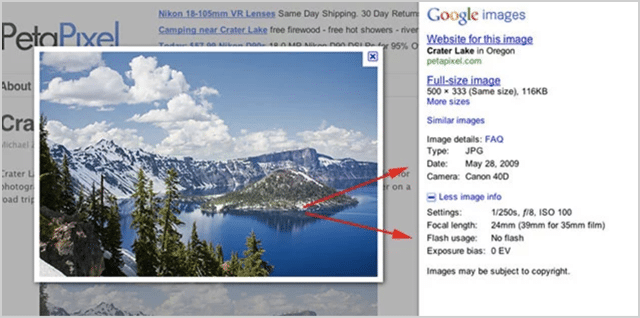
But still:
There is no definitive proof that it actually works to improve ranking.
With that said, since you should be stripping unnecessary EXIF data to make your images lighter…
The effort needed to add in EXIF data is almost none.
So I say; GO ALL OUT!
If there is a chance it can improve your rankings (which is more likely “yes” than “no”), it’s worthwhile doing.
13. Serve Responsive Images (Advanced Load Time Saving Tip)
In other words: serve different sizes of images depending on the screen size used by your user.
I’ll show you how this works with a quick example.
User A views your website from a desktop computer.
Your website serves a large version of your image.
User B views your website from a tablet.
Your website serves a medium-sized version of your image.
User C views your website from a mobile device.
Your website serves a small-sized version of your image.
You get the point.
Instead of resizing the image which consumes valuable bandwidth;
You serve a different version of the image depending on the size of the display used.
The code that makes all this happen is called srcset

If you’re not a coder, like me…
Don’t worry!
WordPress takes care of srcset for you, starting from WordPress 4.4.
For each image you upload to WordPress, it create these versions:
- Thumbnail: A square crop (150px by 150px).
- Medium: Resized so that the longest side is 300 pixels wide or high.
- Medium Large: Resized to 768 pixels wide.
- Large: Resized so that the longest side is 1024 pixels wide or high.
- Full: Original image.
All you need to worry about is this:
Resizing your image to the largest dimension at which it will be displayed.
(Refer to Step #5)
The rest is done “automagically” for you.
14. Use Lazy Loading
You might have noticed that I use TONNES of images in every post.
In fact, this single post on finding email addresses has 46 images:
That’s a whole lot of images that need to be loaded when a user lands on my page.
If I was to load all of those images together, my post would take FOREVER to display.
That’s why I lazy load my images.
Lazy loading is where the browser defers the loading of images (or any other objects like video, embeds, etc.) until they need to be shown on screen.
All other images are adjourned and loaded ONLY when they are needed—i.e., as you scroll down to that section of the page.
Watch THIS POST closely and you’ll notice the images pop-up at the base of the screen as you scroll.
If your posts are long like mine:
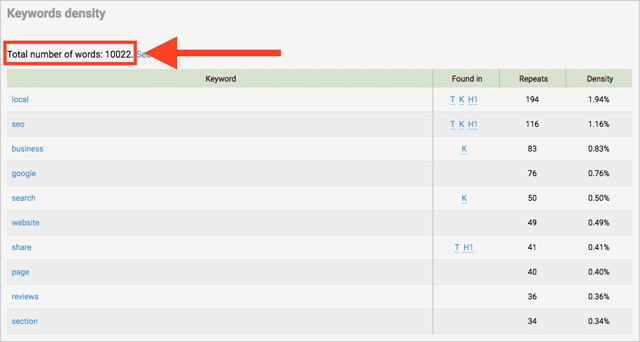
(Some of the posts on this blog are over 10,000 words long)
Lazy loading will improve your page load time dramatically.
One issue though…
If not implemented correctly, your images can get hidden from search engines.
That’s image SEO suicide.
Thankfully, Google has a handy guide explaining how to do lazy loading right.
All methods they recommend involve some use of Javascript – which means you’ll need some ninja web development skills.
Or if you’re using WordPress—as I am—then you can use a lazy-load plugin.
Here’s the one I recommend:
Give LazyLoad a try and watch your page speed skyrocket.
15. Piggy Back Social Sharing for More Reach and Traffic
If you’ve been in SEO for any amount of time, I’ll bet my bottom dollar you’ve debated this:
Does social impact SEO rankings, (or not)?
Here’s the truth:
Social media “signals” are NOT a ranking factor.
Not a DIRECT ranking factor at least.
Let me explain:
Google cannot see everything that goes on inside social media sites.
Facebook, Instagram, LinkedIn, and others are not fully accessible to Google Bots.
Social media sites are concealed behind closed membership walls.
Because of that, the few factors Google can see (likes, shares, etc.) are incomplete signals and thus go largely ignored.
Jump to 2 mins 16 secs in this video, where Matt Cutts settles this once and for all:
Even though social media signals do not impact search rankings…
Does that mean social media is not a good thing for SEO?
Absolutely not!
When your content gets shared across social media, you will increase your potential for links and build an audience for your brand.
Both of these are essential in modern day SEO.
That’s why on every signal blog post I make it insanely easy for readers to share my content.
First, I include social sharing buttons at the top AND side of my post:
And.
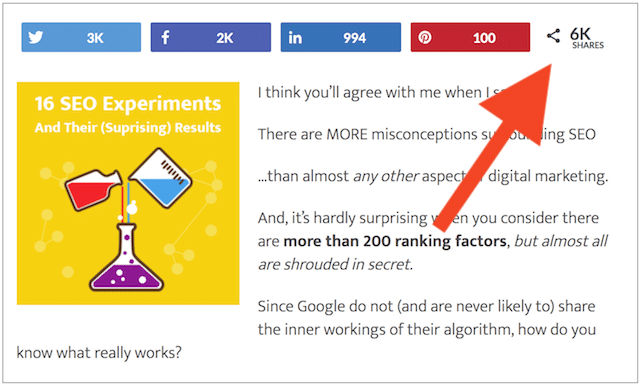
Here’s the important part for image SEO…
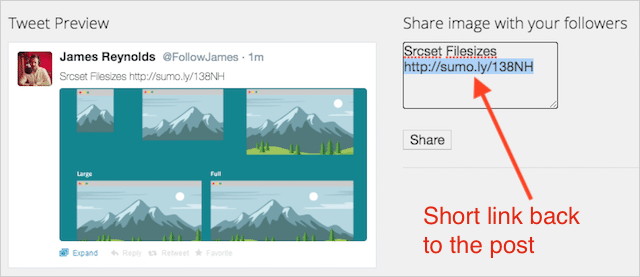
I display sharing buttons alongside each and every image:
Why do both?
It’s insanely hard for visitors to share the images on your site otherwise.
For a reader to share your image with their social media followers, they would need to;
Download it to their computer, upload it to their chosen social media site and then share it to their feed.
That’s WAY too much work.
But here’s the kicker…
Unless that person references you in their post….
Or, you’ve watermarked your images.
Their followers will never find your content.
That’s why I LOVE Sumo’s Image Sharer plugin:
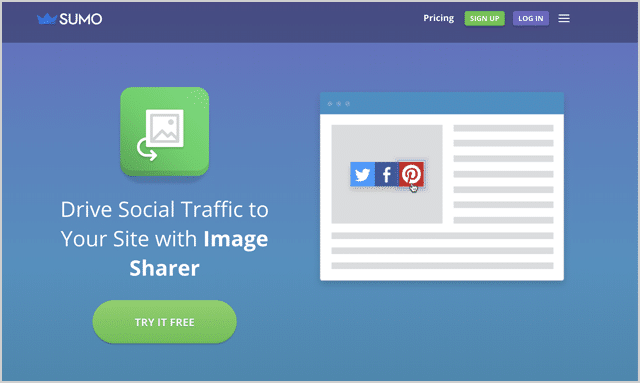
Not only does Image Sharer make it ridiculously easy for visitors to share the images on your site:
But, when they share your images, Image Sharer magically includes a link back to your content, driving viral traffic to your site!
Bada-bing, bada-boom!
16. Browser Caching: How To Use It For Improved Image SEO
What if:
Instead of fetching and rendering images from your server…
Your browser could save and load images locally?
This would drastically reduce server requests…
And speed up page load times on your site.
Well, I’ve got good news for you;
This is exactly what browser caching does.
Here’s how it works:
When you go to a page for the first time, your browser downloads all the images so you can view them.
It then saves a version of those images in its cache.
So that when you revisit the page, the browser loads images locally as opposed to making a request to the server again.

Loading images from a cache are WAY faster than from a server.
Which (speed) as we know, aids user experience and helps to improve SEO.
Enabling browser caching is easy.
If you use WordPress you just need to install a cache plugin.
Here is the top-3 WPbeginner recommends:
- WP Rocket – the one I use.
- W3 Total Cache
- WP Super Cache
With WP Rocket, there are changes you want to make to the standard configuration:
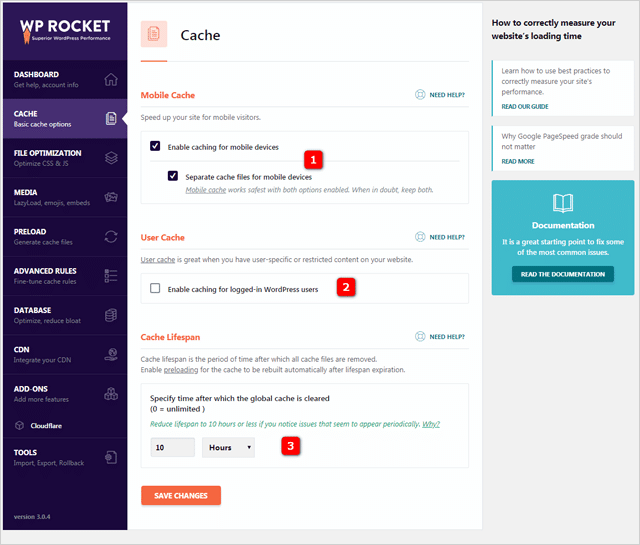
Matt Ahlgren at Web Hosting Ratings recommends these settings:
- Separate cache files for mobile devices – Enable
- Caching for logged-in WordPress users – Disable
- Cache lifespan – Set to 10-hours
As you can tell, if you’re a WordPress enabling browser caching is easy.
If you’re not a WordPress user, it’s a little more tricky…
First, copy this code which tells browsers what to cache and how long to “remember” it.
## EXPIRES CACHING ##

ExpiresActive On
ExpiresByType image/jpg “access 1 year”
ExpiresByType image/jpeg “access 1 year”
ExpiresByType image/gif “access 1 year”
ExpiresByType image/png “access 1 year”
ExpiresByType text/css “access 1 month”
ExpiresByType text/html “access 1 month”
ExpiresByType application/pdf “access 1 month”
ExpiresByType text/x-javascript “access 1 month”
ExpiresByType application/x-shockwave-flash “access 1 month”
ExpiresByType image/x-icon “access 1 year”
ExpiresDefault “access 1 month”

## EXPIRES CACHING ##
Then place it at the top your .htaccess file
Save the .htaccess file and then refresh your webpage.
PRO TIP
You can change the time periods as different file types are cached for like “1 year,” “1 month,” “1 week,” “1 day,” and “1 hour.”
To make changes, simply replace the time-period in the above code, for example, from “1 month” to “1 week”.
With that said, the values in the code above work GREAT for most web pages and blogs.
I recommend you keep them exactly as they are.
For more on browser caching check out this post by Varvy.com.
Browser caching all set up?
Great!
Then, move onto step seventeen.
17. Use a Content Delivery Network (CDN) For Lightning Fast Image Load Times
This is the ultimate Image SEO super hack.
When you use a CDN, your images load faster.
And, not just a little bit faster…
But a HELLUVA LOT faster.
In fact, a test by Woorkup proved a page using a CDN will load as much 2X faster than a page without one.
Here’s the page load time without a CDN:
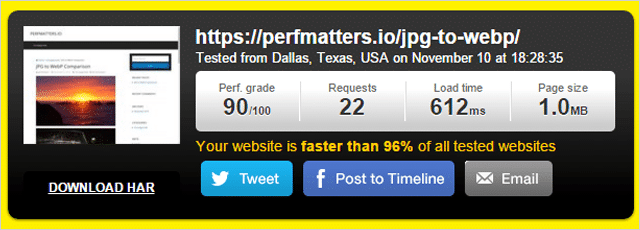
612 milliseconds. Not too shabby.
And, here’s the page with a Content Delivery Network enable

378 milliseconds. Holy smokes that’s fast.
Just by just adding the CDN the load time was reduced by a huge 56.64%!
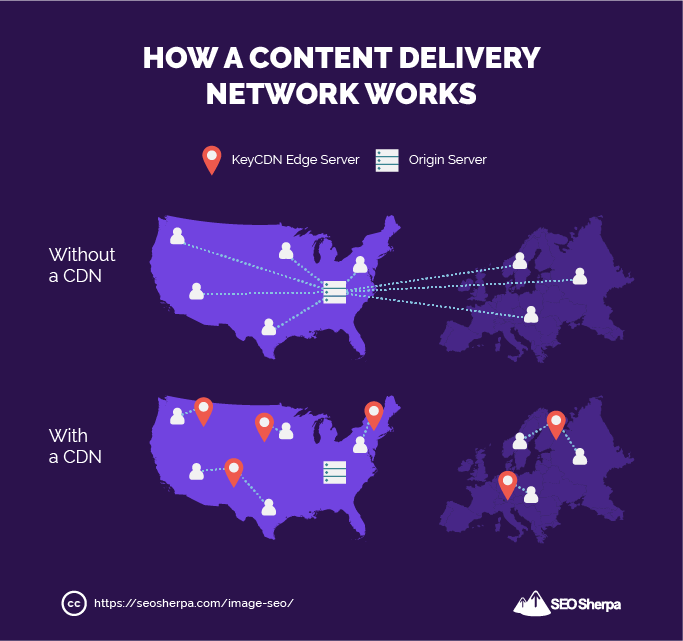
How CDNs work:
Instead of serving your images from a central server…
A CDN stores a cached version of your images in multiple geographic locations, known as Points of Presence (or POPs for short):
Because your content is served from POPs close to the user (and not on a server thousands of miles away)…
It loads lightning fast!
There are lots of CDNs out there:
- Cloudflare – (free tier available)
- KeyCDN
- Amazon CloudFront – (free tier available)
- Google Cloud CDN – (free trial available)
And, many hosting providers like WP Engine have CDNs built in.
But, take note…
When using a CDN, your images do not “sit” on your website
Which means image URLs that used to look like this:
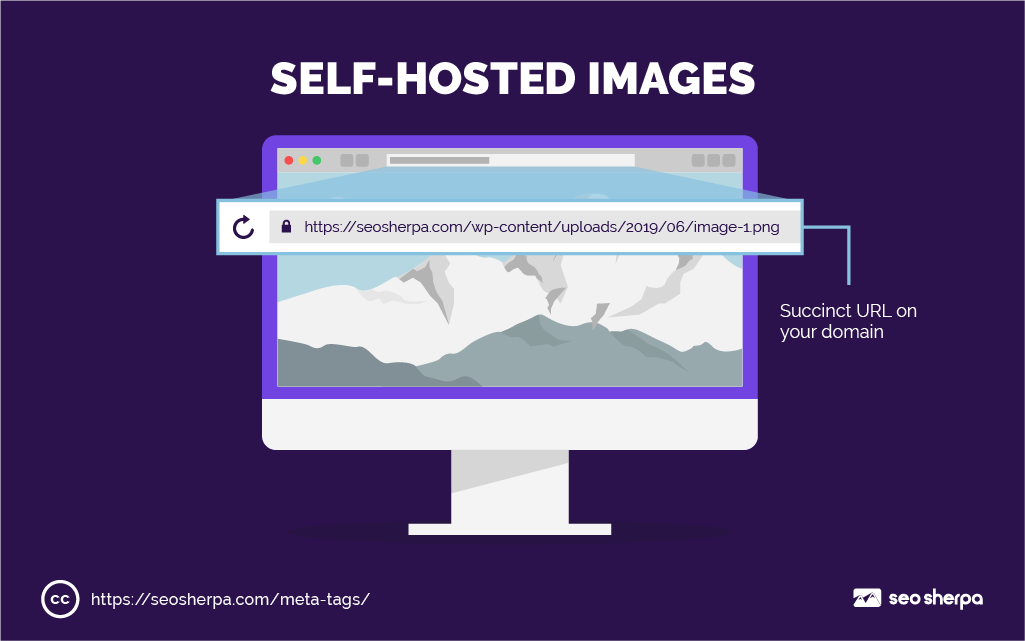
Now look like this:
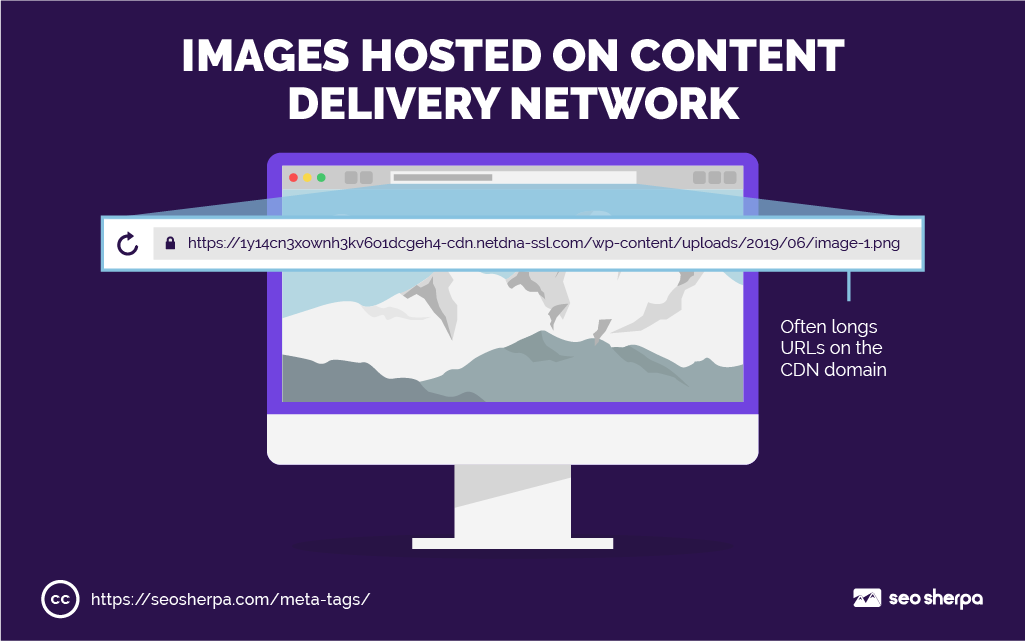
This is bad for SEO, because;
If people embed your images on their site, they’ll link back to the CDN location and not your domain.
Which means you miss out on valuable links and traffic.
Because of that, I recommend you set up a CNAME record.
Don’t worry about the technicalities, just know that it does this;
It changes the ugly URL that gets assigned to you by the CDN provider (like xyz123.cdncompany.com) to a pretty URL on your domain (like cdn.yourdomain.com).
Read this guide to learn how to set this up via c-panel or this guide if you’d prefer to do it via your domain host.
OK, so you set up your CDN.
Now let’s tap into social media sharing for improved image SEO.
18. Use Open Graph and Twitter Cards to Display Rich Snippets and Maximize Social Sharing (3 Step Formula)
I think of Open Graph tags and Twitter Cards like this:
Conversion-rate-optimisation for social media exposure.
When done right, these “tags” transform dull as dishwater social media snippets into enticing click-through-rate magnets.
Have you noticed how some links on social media sites show just text?
Whilst others display a full-sized image, title, and description.
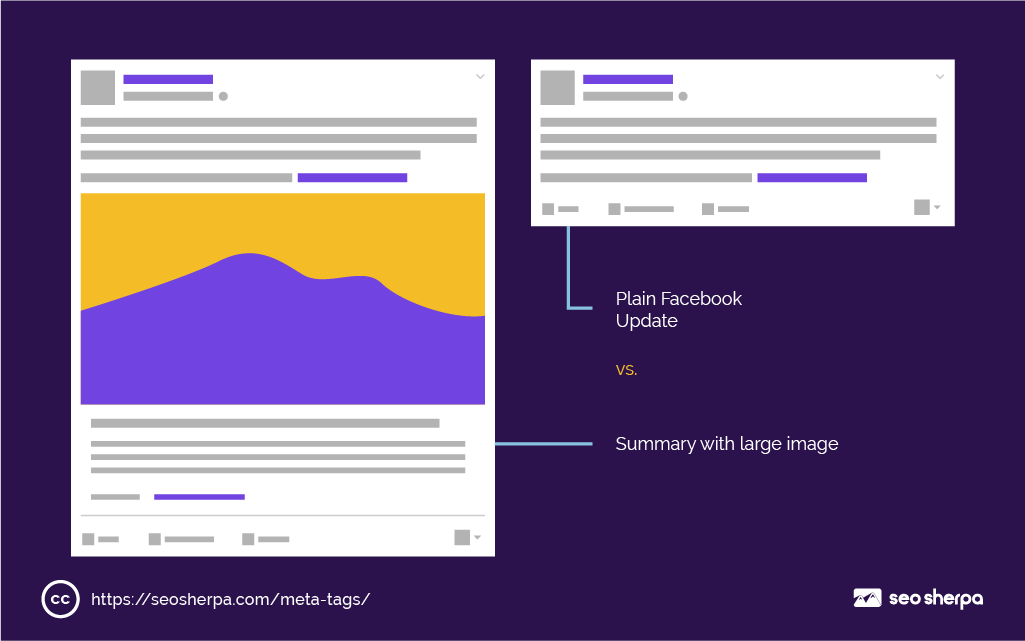
This doesn’t happen by accident.
It’s the result of having social metadata added to a web page’s source code.
In the case of Facebook and LinkedIn, the metadata making this work is called Open Graph.
Whilst for Twitter it’s Twitter Cards.
Pinterest has similar metadata tags too.
These tags inform social media sites what to display in social feeds when your content is shared there. They override SEO metadata which a social site defaults to in the absence of Open Graph (or Twitter Card) data.
In short:
They allow YOU (the website owner) to dictate EXACTLY how your content appears when it gets shared.
And, drive a tonne more traffic to your business.
There is a long list of tags you can include, but (thankfully) you don’t need every one of them.
Really, there are only a few Open Graph tags you truly need:

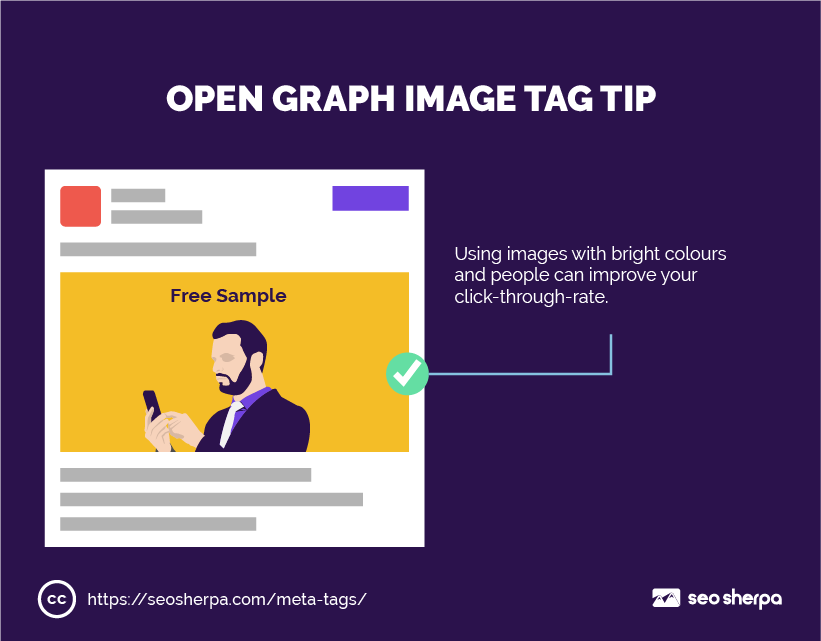
And of all these, the og:image tag is THE MOST important.
Failing to define the Open Graph Image for your post or article means a random image will be displayed.
Which can be a total click-through-rate (CTR) killer.
To maximise CTR using the og:image tag there are just 3 simple steps you need to follow:
Step #1:
Choose an image that will stand out in the news feed.
Images that use bright colours and/or include people work particularly well.
Sidenote – Be sure to match your image to the page (or post) to minimise bounce rates and maximise conversions.
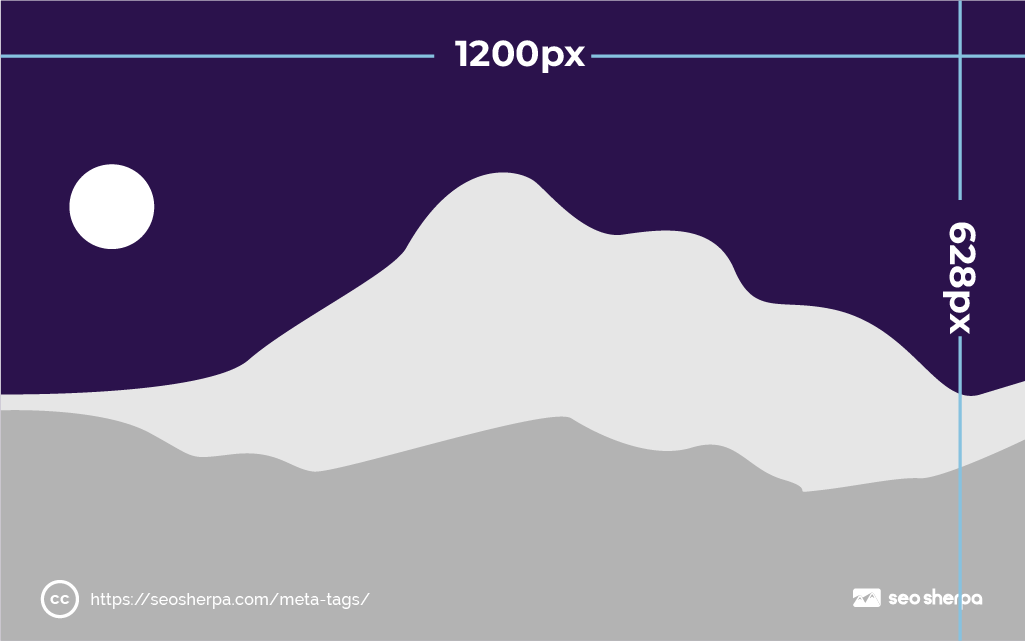
Step #2:
Resize the image to 1200px wide by 628px tall.

Identify the image location in your Open Graph code.
<!– Open Graph data –>
<meta property=”og:title” content=”Title Here” />
<meta property=”og:type” content=”article” />
<meta property=”og:url” content=”http://www.example.com/” />
<meta property=”og:image” content=”http://example.com/image.jpg” />
<meta property=”og:description” content=”Description Here” />
If you are using Yoast SEO plugin, or my choice for social media meta tags, this code is generated automatically when you complete the necessary fields:

For other platforms use Megatag’s social media tag generator tool.
More Open Graph and Twitter Card Tips:
- Adjust (or recycle) unused headline ideas as the title for your Open Graph and Twitter Cards tags.
- Tweak the image and description based on the network. Showcase images and text that will appeal to the unique interests of each network’s audience.
- While Twitter is said to default to Open Graph tags if no Twitter Card markup is on the page, you get a more controlled result if you include both types of markup on your page. In other words, complete both fields for all social media sites in your chosen plugin’s settings.
19. Utilize Schema Markup (for recipes, products, and videos)
Aside from creating KILLER looking images…
Until recently, there was almost NOTHING you could do to stand out in Google Image search.
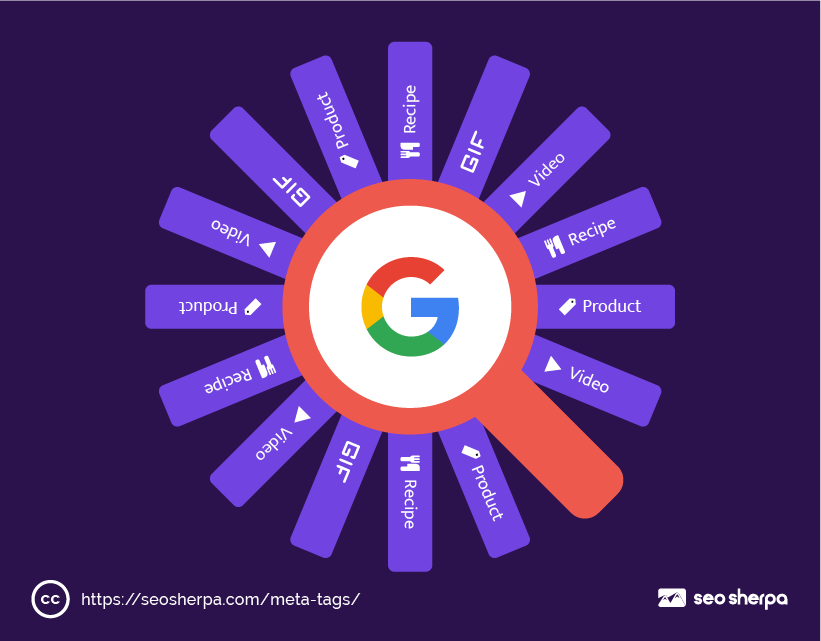
Then Google introduced this:
Image Badges
Image badges show in the bottom-left corner of image thumbnails when users search on the Google app for Android and mobile web search.
In other words:
These badges are visible to the vast majority of searchers since mobile search queries outnumber desktop queries 60:40 these days according to Statista.
Google’s intention with image badges is to categorise content for the searcher:
And, help them find what they want.
Imagine this for a moment:
Jesse wants to bake cupcakes, but she doesn’t know what kind.
Finding an image with a recipe could be challenging for her…
Jesse’s image search leads her to a page that only has pictures of cupcakes, another search leads her to a cupcake fan site that has everything about cupcakes but no recipes…
Imagine Jesse’s frustration 🙂
You can help Jesse (and others like her) by adding schema markup to pages on your site so these badges get displayed.
Currently, Google supports four types of image markup: products, recipes, videos, and GIFs.
You just need to add the appropriate schema markup to the page.
- Add recipe markup to recipe pages.
- Add product markup to product pages.
- Add video markup to pages with videos.
20. Format Your Images for Featured Snippet Victory
The image search results are not the only place images display within search engine results pages.
SEO optimized images show up as their own SERP feature within web results:
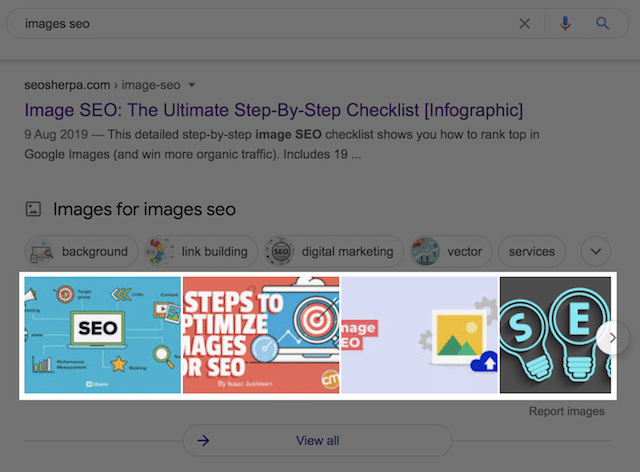
As well as within featured snippets:
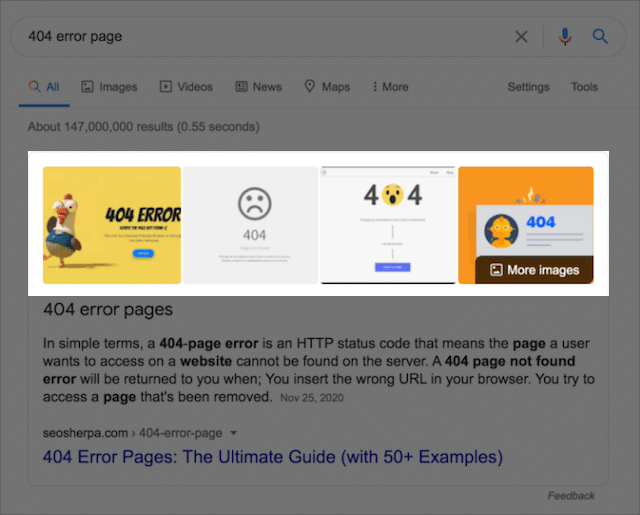
Given the huge growth in featured snippets, and in particular image carousels in recent years:
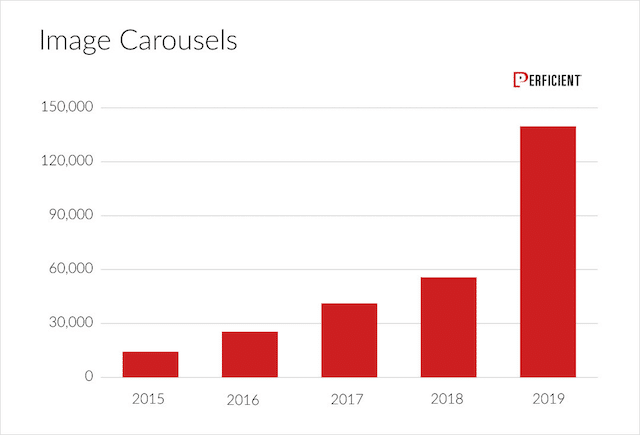
You’d be a fool not to optimize your images to display within featured snippets.
The good news is, that your images can display in a featured snippet, even if the text is pulled from elsewhere.
What’s more, if you’ve implemented all my image SEO tips so far, there’s just one more step to optimize your images specifically for featured snippets.
Sizing Your Images for Featured Snippets
So what is the optimal image size for featured snippets?
According to research performed by A.J. Ghergich and SEMrush, the average image displayed within featured snippets displays at 197 pixels (w) x 159 pixels (h).
So basically, 200 pixels wide by 160 pixels high.
If you want to get your images in featured snippet results – and have them look GREAT, then stick with the same proportion.
I recommend 1200 x 960 px:
The final step is to place your target image toward the top of your page or post.
This tells Google the image is important.
21. Tracking Your Image SEO Performance
You’ve gone to the effort of optimizing your images for search engines…
How do you know if your image SEO is working?
Both Google Search Console and Google Analytics provide you the opportunity to track your image performance.
Let’s begin with Google Search Console:
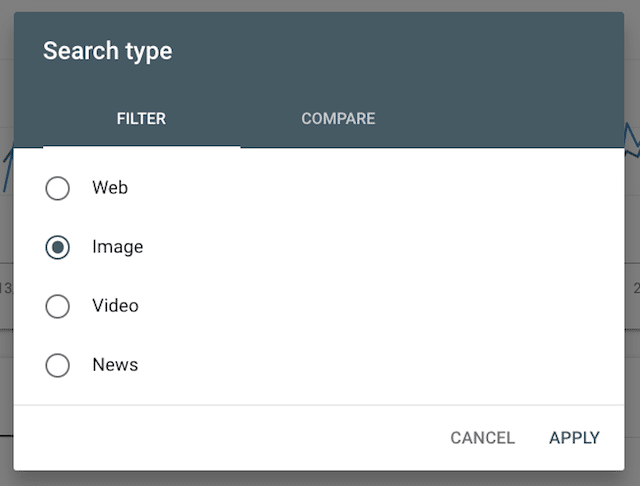
How to Track Your Image Results in Google Search Console
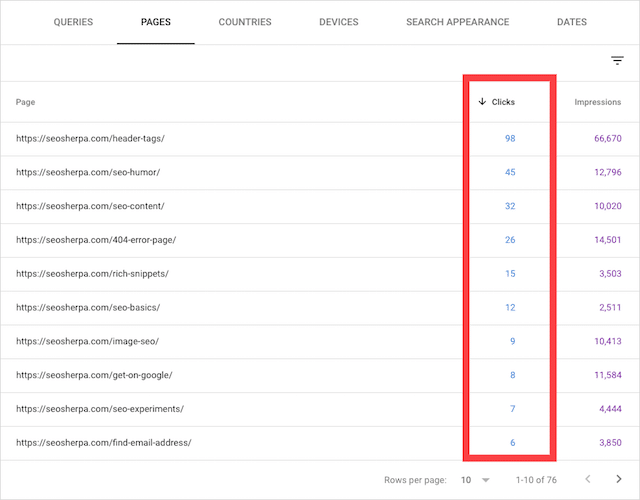
Google Search Console can tell you how your content is performing in web, image, video, and news results.
To see how your images are performing on Google, login into Google Search Console and select ‘Search results’ then ‘Search type’ followed by ‘Image’
You can then select to filter by queries, pages, or both.
As you can see below, some of the posts on the SEO Sherpa blog are driving a good amount of clicks from image results:
Lastly, lets look at how you track image SEO results with Google Analytics.
How to Track Your Image SEO Performance in Google Analytics
To see the visits to your site from Google Images using Google Analytics, follow these steps.
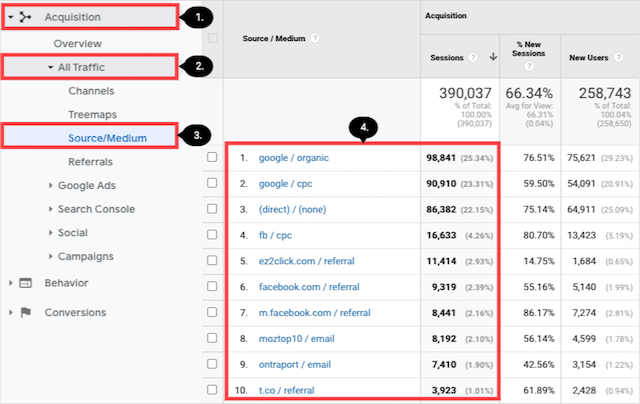
From within your Google Analytics interface, click on ‘Acquisition’ then ‘All Traffic’ then ‘Source/Medium’
The top traffic sources will then be displayed:
Then, to narrow down to Google images traffic, simply type “google images” in to the search bar, and voila your image search traffic will be displayed:
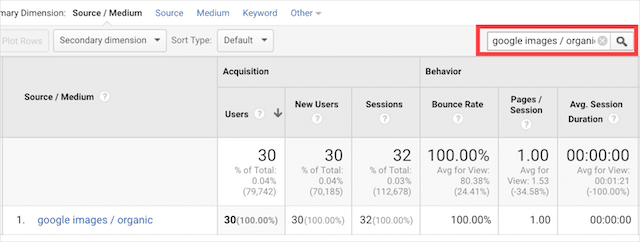
If you’ve implemented everything in this post, then this channel has the potential to drive a boatload of traffic to your site.
Now It’s Over To You
Ready to put these image SEO techniques into practice?
To make things super simple for you, I made a checklist that outlines the exact steps you need to take for each one of these techniques.
This image SEO checklist has 2 bonus strategies that I didn’t include in the infographic.
You can download the checklist right now by clicking the image below:

Final Thought: Images Don’t Just Support Search. They Are Search.
Images are no longer decorative assets.
They are discovery surfaces.
They influence how your brand appears in image search, AI Overviews, visual results, and product-driven experiences across the web.
But most image SEO fails for the same reason most SEO fails — optimisation without strategy.
Files are compressed. Alt text is added. Formats are updated.
Yet the images themselves are not designed to earn visibility, context, or trust.
If you’re unsure whether your images are helping or limiting your search performance — or how visual assets fit into a broader Search Everywhere Optimization™ strategy — clarity starts with understanding the system, not just the settings.
Book a free discovery call with SEO Sherpa and we’ll help you identify where visual search fits into your wider visibility strategy, and what needs to change for your images to actually compete.


Leave a Reply