In today’s post, I’m going to show you how to quickly and easily decrease your website load time (and why it’s important).
In fact:
The techniques I’m about to reveal are the very same strategies I used to increase my page speed from a fully loaded time of 3+ seconds to 1.2 seconds sharp.
But here’s the best part:
None of these website loading improvements require developer know-how and can be implemented by even a novice SEO super fast.
If you want to increase your site speed, rank higher, boost engagement and convert more traffic, this post is for you. But first, why is a fast webpage load time important?
Article Summary
- Image SEO is no longer about filenames and alt text alone
- Google now evaluates images based on context, relevance, and intent
- Images contribute to visibility across web search, image search, and AI results
- Poorly optimized images slow sites down and hurt user experience
- Strong image SEO supports accessibility, discoverability, and conversions
- Visual assets are becoming ranking and trust signals, not just design elements
- Image optimization is a core part of Search Everywhere Optimization™, not a standalone task
Website Load Time Statistics

- 59.2% of users will leave a website in the first 6 seconds if it is slow to load – Unbounce
- As a page load time goes from 1 seconds the probability of a bounce increases 32% – Think With Google
- Decreasing load time by 0.1 seconds leads to the bounce rate of lead generation pages improving by 8.3% – Google, Fifty-Five, and Deloitte
- When load time is reduced by just 0.1 seconds:
- Retail customer engagement increases by 5.2%.
- Bounce rates on product listing pages in the retail and travel categories improve by 5.7% and 5.4% – Google, Fifty-Five, and Deloitte
- Website conversion rates drop by an average of 4.42% with each additional second of load time between zero and five seconds – Portent
- Increasing site load time by one-tenth of a second results in a 7% decrease in conversion rates – Akamai
- Decreasing site load time by one-tenth of a second results in an 8.4% increase in conversion rates for retail sites and a 10.1% increase in conversions for travel sites – Google, Fifty-Five, and Deloitte
- If an eCommerce site loads slower than expected, over 45% of people admit they are less likely to make a purchase – Unbounce
- Around 70% of people say that the speed of a page affects their willingness to buy from an online retailer – Unbounce
- 77% of smartphone shoppers say they are more likely to purchase from mobile sites that offer them the ability to make purchases quickly – Think with Google
- Retail sites see a 9.2% increase in average order value when load time decreases by one-tenth of a second – Deloitte
- The mean time it takes a mobile webpage to visually complete loading is 21.6 seconds – Backlinko
- The mean time it takes a desktop webpage to visually complete loading is 8.2 seconds – Backlinko
- The average page loading speed for a fully loaded web page is 27.3 seconds on mobile – Backlinko
- The average page loading speed for a fully loaded web page is 10.3 seconds on desktop – Backlinko
- The average web page takes 87.84% longer to fully load on mobile vs. desktop – Backlinko
- Slow-loading mobile pages result in two times higher bounce rates and 27% fewer page views when compared to desktop pages – Perficient
Now you understand the importance of a fast-loading website, let’s cover what page speed is (precisely) and how you can improve it.
What is Page Speed?
Page speed is the amount of time it takes for a webpage to load.

Otherwise known as loading time, page speed is measured by the interval between a browser requesting a webpage and when the browser renders the page.
A page’s loading speed is influenced by various factors such as the distance data travels, the website’s server speed, the complexity of its code, the page file size, and the connection type.
Not to mention, file compression, caching, render-blocking, and dozens of other factors that affect page speed and SEO.
As you are beginning to tell, improving page speed isn’t as simple as installing a page speed plugin.
There are numerous, sometimes complex factors that contribute to how fast – or slow – your website loads.
Not just that, there’s also no “one way” to measure the load time of a page, there are many.
Here’s the three most common:
Page Load Time
This is how long it takes for the page to load in full.
Time to fully loaded measures the loading of all the visible parts of a page, as well as the hidden elements like scripts and code – basically it measures the load time of 100% of all resources on the page.
It’s the simplest page speed metric to understand, but not necessarily the most useful, since the page may appear loaded to the user (and actually work) long before the page loads in full.
Largest Contentful Paint
Largest Contentful Paint (LCP) is a more valuable metric to determine the load time of a page from the point of view of a user.
It measures the time a webpage takes to show the user the largest content on the screen.
Typically that’s the page headline, the featured image, or main text content.
In short, LCP measures the time for the important above-the-fold content to be fully visible to the user.

For example, let’s say a page takes 10 seconds to fully load.
The page wouldn’t “appear” to load slowly as long as the first contentful paint occurs within a couple of seconds.
In short, you can get away with a slow fully loaded time as long as your largest contentful paint is fast.
Time to First Byte
Simply put, this is a measurement of how long a web browser has to wait before receiving its first byte of data from the website’s server.
TTFB doesn’t really measure how long a page takes to load, it does however influence page load time.
The longer it takes for a browser to receive data from the server, the longer it will take to display a page.
How to Calculate Page Load Time?
There are lots of different methods to measure page speed:
- Time to First Byte (TTFB)
- Largest Contentful Paint (LCP)
- First Meaningful Paint (FMP)
- Time to Interactive (TTI)
- First Input Delay (FID)
The list goes on…
And because not one of these metrics is any better than another.
I recommend you work on speeding up your website across all of them.
Don’t worry. In a moment I’m going to show you how, but first:
Why Is Page Speed Important for SEO?
There is no denying it, Google is obsessed with page load speed.
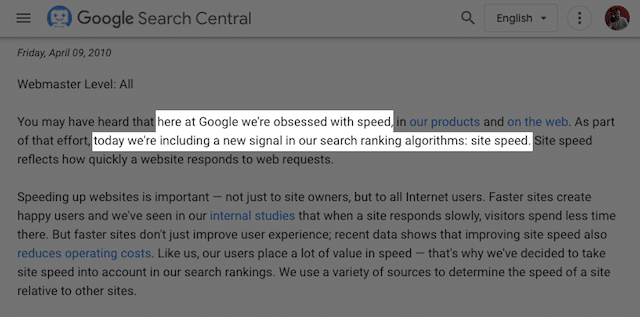
Ever since 2010, Google has used site speed (and therefore page speed) as a ranking factor in its search engine algorithm.
Then in 2018, Google rolled out the “Speed Update” which further impacted the search engine rankings of slow loading pages.
And most recently in 2021, Google introduced Page Experience of which a major component was core web vitals and loading speed.

Google cares a lot about page speed – and why wouldn’t they?
If Google is going to send a boatload of free traffic to your website, they want users to enjoy a GREAT experience. A huge part of that is a fast-loading webpage.
Simply put:
A slow-loading website will damage your Google rankings.
A fast-loading website will help your Google rankings.
The only question is, how do you go about improving your page load times? We’ll cover that next.

How to Speed up Your Website: 15 Best Practices for Decreasing Web Page Load Times
There is no escaping it, a lot of what contributes to page speed is deep-rooted in code and highly technical.
Creating AMP Pages, minimizing HTTP requests, and using asynchronous loading – all require developer-level know-how. And, because of that, I won’t be discussing those page speed optimizations in this post.
Instead, I’m sharing 15 easy-to-implement (yet often forgotten) ways to boost your site speed like never before.
Let’s jump in:
(1). Perform a Page Speed Test So You Can Benchmark Your Loading Time (and Know What to Improve)
Before you attempt to improve your page speed, it’s helpful to know how fast – or slow – your website loads.
After all, if you don’t know your current page speed, how will you know if your speed optimizations are successful?
You can use several tools to assess your page speed improvements, and I recommend running your site through all.
But a quick word of warning:
Your scores will vary wildly from tool to tool.
That’s because each web page speed test tool uses different methods to assess performance. Not only that, the locations of their servers are in varying cities – and as you’ll find out later – server location has a HUGE impact on website load times.
There’s no need to get caught up on the specifics. For now, just run a test with each tool and note down your scores.
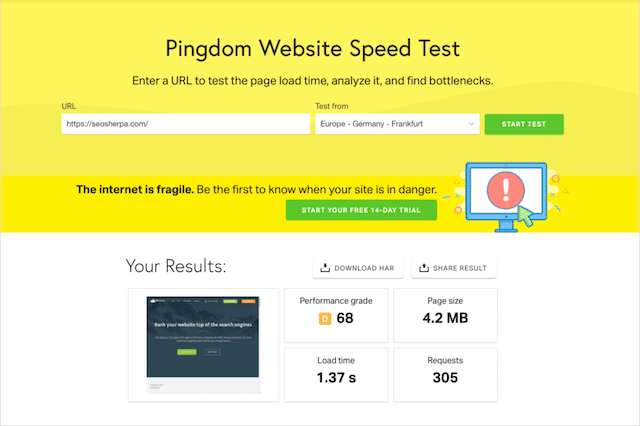
Pingdom
An easy-to-use site speed test that mimics the way a page is loaded in a web browser. Pingdom currently offers seven server locations from where you can test your site.
Unlike other tools that measure the load time according to when the page is fully loaded, Pingdom uses On Load Time which records when all resources on the page have been downloaded. At this point, the page would be interactive, but scripts may still be running in the background.
GT Metrix
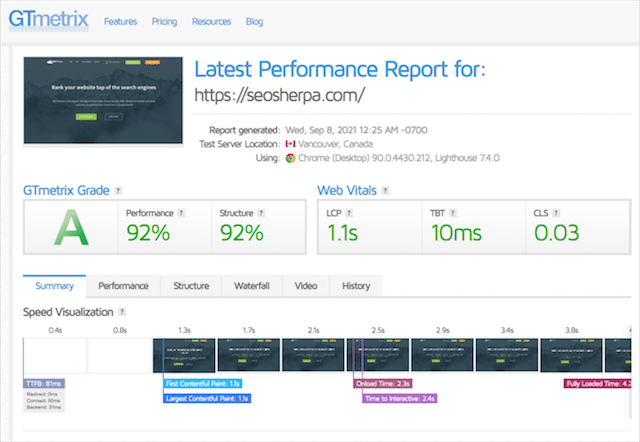
A page speed testing tool that offers both desktop and mobile measurement and the option to test across multiple browsers. GT Metrix provides various server locations, including 7 on the free plan and a further 15 on the pro plan.
The default measurement is fully loaded time, with on-load time optional.
WebPageTest
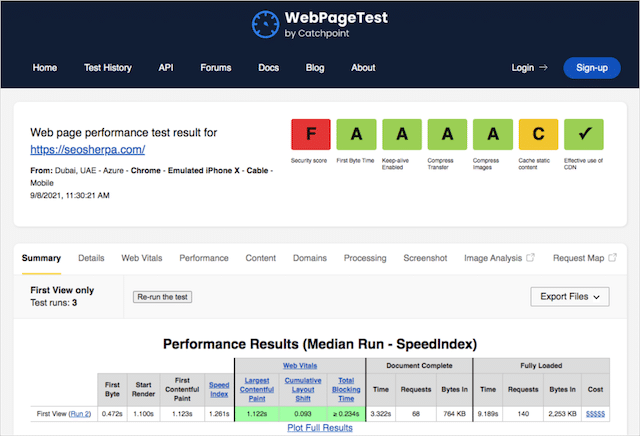
WebPageTest is another great tool that shows you the speed and performance of your website in different browsers.
The WebPageTest has the most extensive number of test locations, with 38 in total. Like GT Metrix, WebPage Test uses fully loaded time by default, with on-load time (also known as Document Complete time) optional.
PageSpeed Insights
This is Google’s tool for assessing page speed performance. Unlike the three tools mentioned above, Google uses field data instead of lab data in its scores – assuming field data is available.
What this means:
Instead of running a test that simulates the load time for a real user, Google PageSpeed Insights collects real user data from Chrome browser users. This data is aggregated over 30-days, which means that you may not see an improvement in your score until 30-days after you optimize your load time.
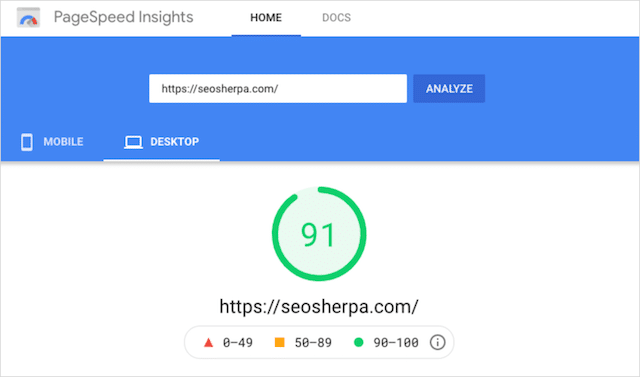
It’s important to know Google’s assessment of your load time. It’s this score they use for Core Web Vitals – a key part of the Page Experience signals that contribute towards search engine ranking performance.
That said, the other three tools (Pingdom, GT Metrix, and WebPageTest) are more useful for a quick before and after measurement of your page speed performance.
A couple of pointers:
Firstly, select a test location near your target audience. If your test is run from the United States, but your users are in Australia, you won’t get a realistic measure of page speed performance.
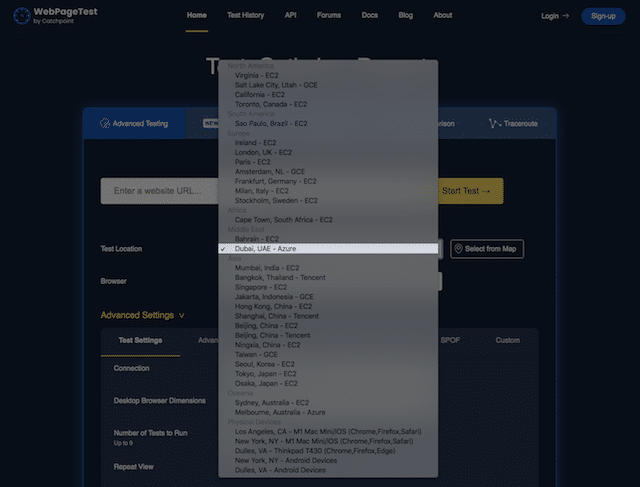
Secondly, don’t make the mistake of testing ONLY your homepage.
Pagespeed is unique to each page.
I suggest you test all your most important URLs and use Google Analytics to identify your slowest loading pages quickly.
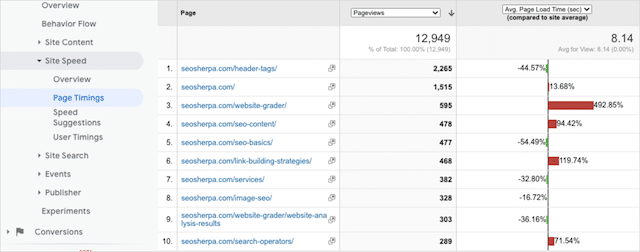
Tip – you can find ‘Page Timings’ under ‘Site Speed’ in GA’s ‘Behaviour’ menu.
Got that? Cool.
Let’s begin to optimize our page speed.
(2). Switch Out Your Free Domain Name System for a Lightning Fast DNS Host
Think of a Domain Name System (DNS) host, like a phone book.
It maps your human-readable domain name to an IP address (where your website is actually located).

In short:
Each time a user types your web address into their browser’s URL bar, the browser does a DNS lookup that converts the web address into an IP address, and by doing so, locates the server where your website is hosted.
By default, you’ll be using the free DNS service offered by your domain registrar.
NameCheap, GoDaddy, Google Domains (and almost every other domain registrar out there) provide you with the capability to set up your nameservers and route your domain to the IP address of your web host.
The trouble with these free DNS services?
They’re really slow.
If you want a rocket-fast website, I recommend switching your DNS to Cloudflare.
I shifted from Namecheap’s DNS service and went from a query time of 26 ms:
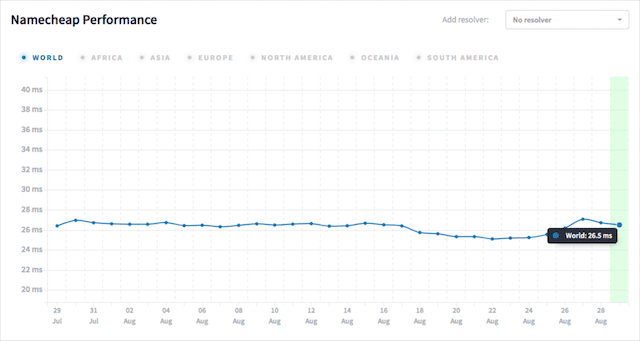
To a staggering 13 ms.
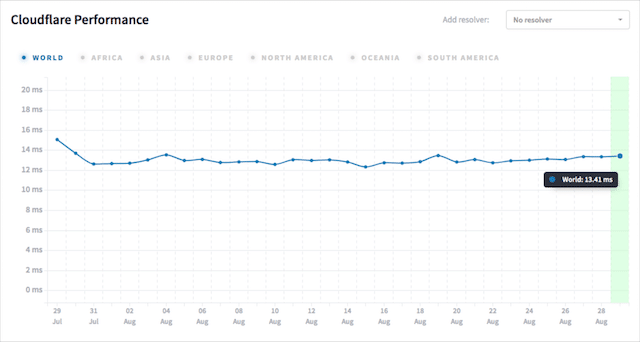
In other words, I cut 50% from the DNS processing time.
Best of all, it didn’t cost me a dime.
Once you’ve signed up for a free Cloudflare account, you simply login into your domain registrar and replace the default nameservers with Cloudflare’s.
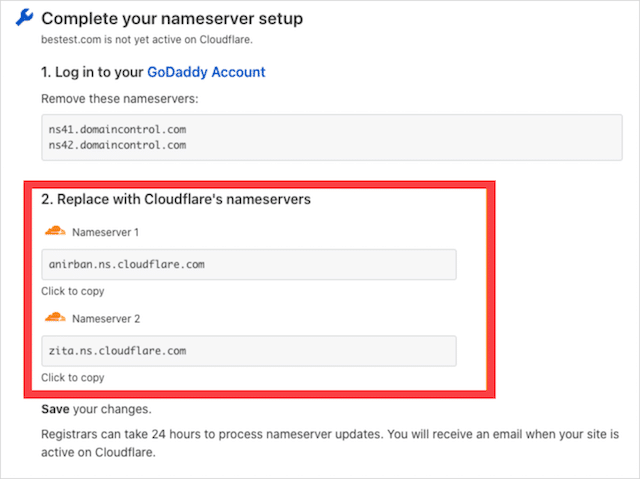
And with that, you are done.
(3). Implement This Caching Double Whammy and Accelerate Load Times
Here’s what (typically) happens when a user lands on your website:
- Their browser contacts your web server
- Your content management system pulls the latest data from your database (like your recent posts and pages)
- Your web server compiles the data in to an HTML page and serves it to the visitor

A caching plugin removes the first two steps entirely.
To avoid a new request being made to your server every time a visitor views a page, a caching plugin will save a prebuilt version of your web page and serve it to your visitors.

And in doing so, it speeds up the load time for users.
My go-to recommendations for WordPress caching plugins are:
- WP Rocket (what I use)
- W3 Total Cache
- WP Super Cache
Since a caching plugin removes database lookups, it can cut 1-3 seconds off your website load times.
Not bad.
But if you want your pages to load crazy fast, I recommend this:
Edge Caching (CDN)
Unlike page caching, which stores a cached version of your website on your central web server…
Edge caching stores entire HTML pages on “edge nodes” located on a server network spanning the globe.
What this means:
Instead of a request being made to a server on the other side of the planet…
When a visitor requests to open a page, it gets delivered from a server located close by.

Like page caching, a prebuilt version of the web page is saved for immediate access, and a call to the database is not required.
As you can imagine, if data only needs to travel a few hundred kilometers versus thousands – and the page is prebuilt ready for users – it’s going to result in faster load times.
Not only that, since edge caching does a tonne of work, it also takes the pressure off your web hosting, which can improve your site speed further.
The Edge Caching service I recommend you use is Cloudflare’s CDN:
With 200+ servers around the world:
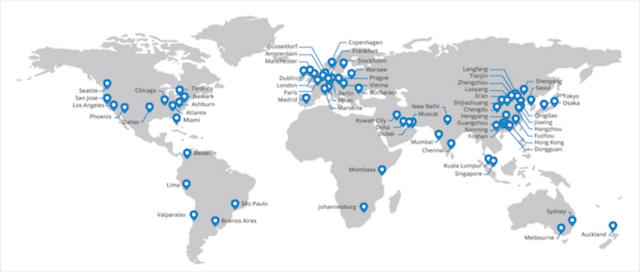
And, at only $20 per month, it’s an absolute steal.
(4). Optimize Your Images to Reduce Huge Payloads
Nothing slows a website down like bloated images.
And, it’s hardly surprising.
Images make up a huge chunk of the page size.
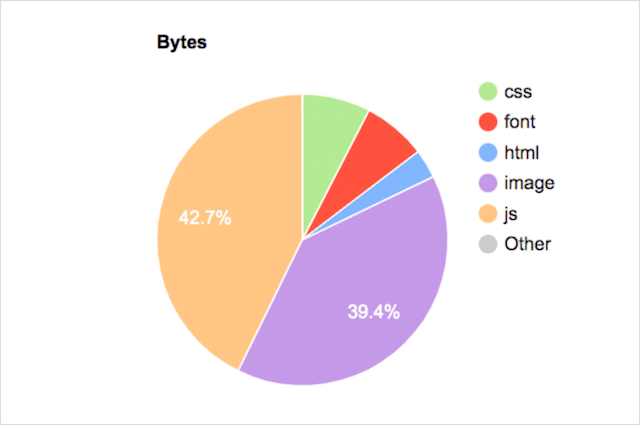
(Nearly 40% of the total page weight for our SEO services page).
So the more that you can optimize your images, the faster your page will load.
The only question is how?
Firstly you want to resize all your images to the largest size they need to be – and no larger
For instance:
The images on this page have a maximum width of 640px.
If I were to load an image 650px wide, I’d have added unnecessary weight to the page.
Not only that, since my CMS would need to resize the image to 640px wide to fit the dimensions of the page, load time would be slowed down even further.
With that in mind, I recommend you resize your images to the max they’ll need to be BEFORE uploading them to your website.

You can use an online image editing tool like Pixlr or a tool native to your computer. The mechanism doesn’t matter – you need your images the same size as the maximum viewable area.
The second thing you want to do is choose the right file type.
Selecting the wrong file format can add extra weight or result in images being low quality.
Unless your images are animated, PNG or JPEG is the lightest – and therefore fastest to load.
Here’s how to know which file type to choose:

Thirdly, you want to strip out all the unnecessary bloat from your image file while maintaining as much quality as possible.
Don’t worry about the technicalities.
Just install Imageoptim and let the tool do the rest.
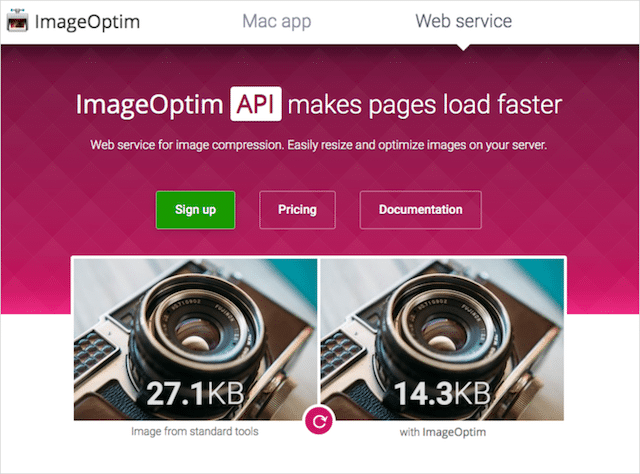
It can help reduce your file sizes by about half.
But wait!
What if your images are already loaded?
Good news. If you are on WordPress, I have a solution:
WP Smush!
WP Smush automatically compresses any image you upload to the WordPress media library.
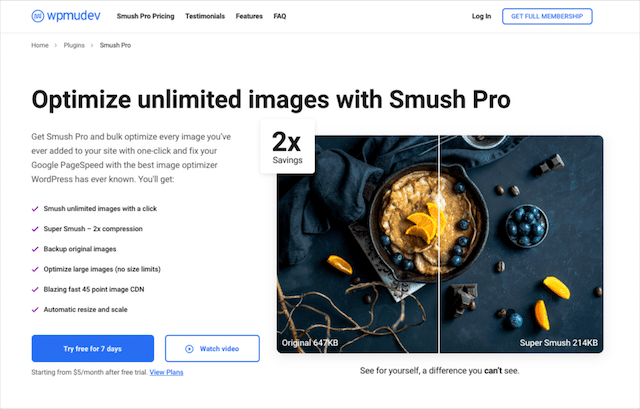
And reduces the file size by more than 2 times, without any noticeable drop in visual quality.
Pretty cool, right?
Once you’ve compressed your image file sizes, there is one more image optimization trick you can use to improve your webpage load times.
(5). Implement Lazy Loading (But Not on Your Logo)!
Even if your images are light as a feather, your page weight can still be heavy if you use a tonne of graphics in your posts (like me).
Not only that, if every image needs to load for the page to render – your page loading time will be prolonged.
Enter lazy loading.
Lazy loading is where the browser delays the loading of images until they need to be shown on screen.
In other words, not all images are loaded at once.
Some images (and other assets like videos and embeds) are postponed and loaded ONLY when needed—i.e., as users scroll down to that section of the page.
If you watch my blog posts closely, you’ll see lazy loading in action:
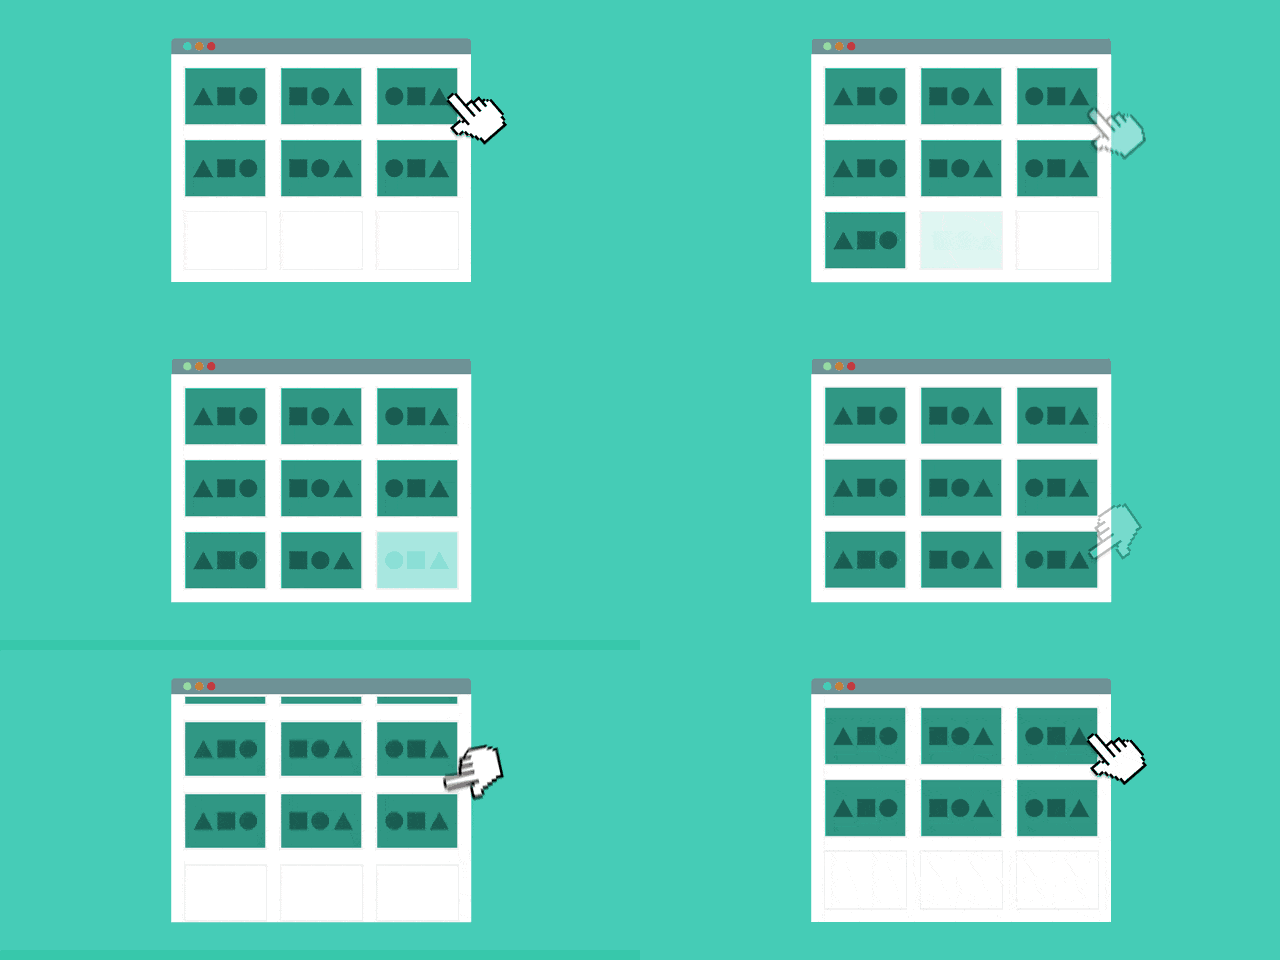
Lazy loading is powerful. It can really speed up a site. But, there’s one BIG issue with lazy loading:
When it’s turned on, it lazy loads ALL the images.
Since most sites – like mine – have images that should display on load, using lazy loading can actually hurt the largest contentful paint.
The point here is that default lazy loading settings will apply lazy loading tags to all of the images on the page, including those at the top that should immediately display to the user.
Which means:
Images “above the fold” have to wait for the lazy load JavaScript library to execute before the images at the top of the page can load. In other words, the lazyload JavaScript blocks the rendering of assets needed for a fast largest contentful paint (LCP).
To address this problem, grab the URL of your logo and any other above-the-fold images (Hint! Your featured image) and add it as an exclusion in your lazy loading plugin.
I use WP Rocket, and here are the settings:
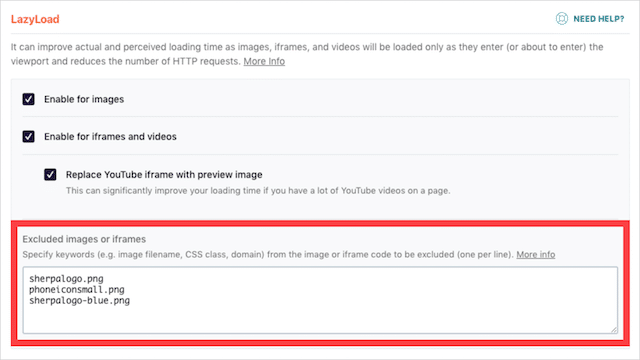
Whether you use WP Rocket, or Autoptimize (another great plugin for lazy loading), be sure to defer the loading of images and set your logo as an exclusion.
With that, on to another thing which should be set to “defer loading.”
(6) Defer JavaScript Files and Increase Your Page Speed
If you’ve ever run your site through PageSpeed Insights or GT Metrix, you’ll be familiar with this warning:
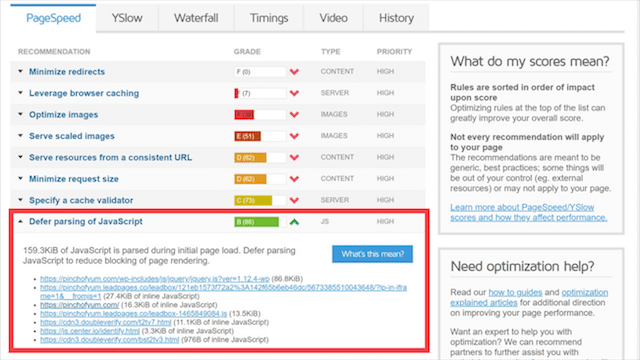
There is no escaping it. JavaScript is one of the biggest culprits affecting website load time.
But why?
When someone visits your site, your web server delivers your website’s HTML content to the user’s browser.
The user’s browser then works through the HTML from top to bottom to render the page.
If it finds any JavaScript during that process, it stops rendering the rest of the page until it has fetched and parsed the complete JavaScript file.
Since script files are big and can take some time to load, they can really affect loading times.

And here’s the deal:
Most JavaScript files like Live Chat, popups, widgets, or even tracking scripts are not needed for the page to properly render.
And that’s why I recommend you delay the parsing of JavaScript files until after the page has loaded.
This way, all the essential content on the page gets loaded, and then scripts execute later.
If you use WordPress, both WP Rocket and Perfmatters allow you to delay JavaScript rendering.
In case you are curious, here are my Perfmatters settings:

The scripts you delay on your site will be unique to you.
A quick review of GT Metrix recommendations will show you the culprits slowing your load times.
(7). Upgrade Your Hosting
Not all web hosts are made equal. Far from it.
The difference in response time between a fast and slow hosting provider can easily be 800 milliseconds.
It might not sound much, but that’s a 4X difference:
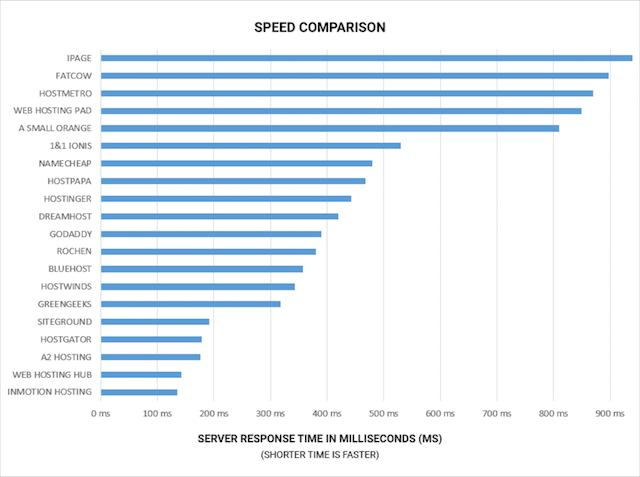
I’m not going to call out individual hosting providers because I’ve only tested a handful of them, but the chances are if you spend $4.99 per month on hosting, your site isn’t going to load quickly.
That’s because most budget hosting plans put your site on the same (overburdened) server as hundreds of other websites – leading to slowdowns, lags, and even downtimes.
I can’t speak to the performance of most hosts out there, but as a general rule-of-thumb, you get what you pay for.
Still, if you are looking for hosting suggestions, here are two premium hosts I use and can personally recommend:
- Cloudways – Managed cloud hosting on a speed-optimized server stack to provide with 60+ locations around the globe. My go-to recommendation for clients.
- WP Engine – Managed hosting for WordPress websites with page caching at the server level. The same webhost this site is hosted on.
Whether you go with my recommendations or another, you should look for a couple of factors.
Firstly, you want a hosting provider that uses a solid-state drive (SSD).
Solid-state drives are way faster than standard hard drives, which means shorter page load times.
Secondly, go with a host with a server located in your country – or at least your continent.

Websites typically perform 1+ seconds slower outside of the country where the server is located.
With that stat in mind, if you’re currently on a cheap shared server located far, far away, it’s time to upgrade to a dedicated, local SSD server.
(8). Clean and Compress Your Code
In short, you want to minify the resources found on your page.
Minification (if that’s actually a word) is the process of removing unnecessary spaces, characters, and comments – in fact, any unneeded elements – to reduce the size of files.
Lighter files mean less data to transfer – and faster load times.
The process of minifying files is typically focused on JavaScript and CSS but can also include HTML.
But, before you freak out at the thought of combing through every line of code on your website to find redundant elements, don’t worry.
You can easily minify your code by installing WP Rocket and ticking a couple of boxes:
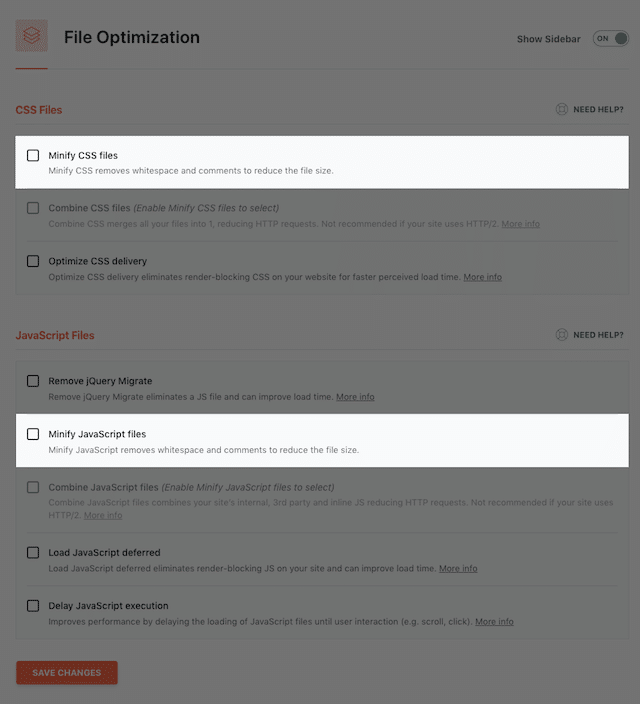
WP Rocket will minify your code automagically!
A second method to reduce files is GZIP compression.
GZIP works similarly to the ZIP and RAR compression you use on your computer but is handled by your server.
Basically, when a visitor lands on your website, their browser requests the site’s files from your web server. When GZIP is enabled, your server will compress those files before sending them to the user’s browser.
And, because those files are compressed and lighter – the transfer is faster.
Since I use WP Engine hosting, GZIP is already enabled.
If your hosting doesn’t support GZIP compression, you can enable it via WP Rocket or W3 Total Cache.
Or, do it manually if you’re skilled in this kind of thing.
(9). Ditch Your Outdated HTTP to Take Advantage of the Faster HTTP2 Protocol
I can’t believe I’m saying it in this day and age.
But if you are still running your website on HTTP (as opposed to HTTPS) protocol, make the shift now.
You probably know that HTTPS is a ranking signal.

Basically, if your website uses a secure and encrypted HTTPS protocol, Google will give your site a small ranking boost. On the contrary, if you use HTTP, your ranking performance gets dampened slightly.
But that’s not the only reason to get an SSL certificate and switch to HTTPS hosting.
Did you know that HTTPS is also faster?
When your site is running in HTTPS mode (encrypted), your web browser software will use the newer HTTP2 protocol (assuming your host supports it), which is significantly faster than the earlier HTTP 1.1 protocol.
In fact, using HTTPS will allow your site to download 14.3% more quickly:

Not too shabby!
Before hastily switching to HTTPS with your current web host, consider that many cheap hosting providers still don’t support HTTP2.
If yours doesn’t, it’s a surefire indication their infrastructure is outdated and yet another reason to jump ship to a premium hosting company like Cloudways, WP Engine, or Kinsta.
PRO TIP: Subscribe to Cloudflare’s 0-RTT (zero round trip time) feature, which speeds up the HTTPS encryption negotiation even further!
(10). Use the Highest Version of PHP Your Website Will Allow (And Lock in Faster Processing Times)
PHP is the programming language used by popular CMS like Joomla, Drupal, and WordPress.
Believe it or not, it’s the codebase used by 4 out of every 5 websites:

One good thing about PHP is that it is continually updated for enhanced security and improved performance.
Infact, new versions of PHP get released every 6-12 months or so – and each new PHP update is typically is 10-30% faster than the previous version.

Each version operates faster than the last due to an increase in the number of database requests it can process at once.
For instance, comparing PHP 7.3 to PHP 5.6, the later version can handle 3 times more transactions per second.
If your site is on WordPress, it’s a no-brainer decision to update your site to the latest PHP version.
Specialized hosting providers like those already mentioned update your PHP version automatically.
Alternatively, you can check your Site Health settings under the Tools menu in WordPress. From there, you will see the PHP version you are running:
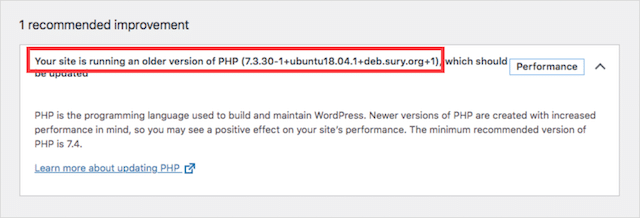
And can update it accordingly.
(11). Use This Service for Video – It’ll Speed Up Your Website Significantly
There’s no denying it; videos are an exceptionally good way to engage your audience.
But the trouble is, they take up a huge amount of server resources to load.
And, as you are beginning to learn, the less strain on your server, the better, because the faster your page speed will be.
So, in the case of video…
Instead of self-hosting videos on your site, use a standalone video hosting service like YouTube, Vimeo, or Wistia.
Then add the videos to your website using an embed code.

This way, your server won’t get occupied loading heavy video files and can use the time to process other elements on the page.
But of each of these services, which one is better?
According to WP Rocket, Vimeo is marginally faster than YouTube and Wistia – and MUCH faster than Daily Motion, the slowest player.

Still, the difference between these top-3 is minimal, which is why I opt for Wistia for most of my videos.
It has outstanding analytics and supports video site maps – which is a great feature for SEO.
(12). Find (and Fix) 3XX Redirects
301 and 302 redirects are useful.
They’re used to redirect a redundant page to an alternate working URL.

The trouble is they are dastardly for page speed.
Why?
Because whenever a user attempts to access a 3XX status code page, two requests are made to the server.
One for the original (redirected) URL and another for the final destination URL.
That can mean a significant increase in website loading time.
But here’s the thing…
You cannot do away with 3XX redirects entirely. That would be massively detrimental to your SEO.
However, you can minimize unnecessary 3XX status codes:
(a). Internal Redirects
Internal redirects occur when a page with internal links pointing to it gets redirected to another page.
For instance:
On your homepage, you link to an article about the keto diet (e.g., healthyfitness.com/keto-diet/)
Later you decide to create a new article on that topic and redirect the old article to the new article (301 redirects from healthyfitness.com/keto-diet/ to healthyfitness.com/new-keto-diet/)
Great job – that’s good practice for SEO.
The trouble is, the internal link you placed on your homepage now goes through an unnecessary “hop” – and while it works for the user – it’s adding additional load time for those following that link.

Thankfully, there is an easy fix. Simply update the link at the origin to the final destination URL.
A simple way to find redirects on your site is to install Check My Links. This browser extension will crawl your page and highlight any links that are redirecting.
A quick scan of the SEO Sherpa homepage identifies multiple internal redirects in the footer:

All I need to do is log in to WordPress and update those footer links to the final destination.
(b). Redirect Chains
Redirects are bad for load time, but they are even worse when they are in a chain.
Chains of redirects do happen when one redirected page redirects to another redirected page – and so forth.
They are normally an outcome of changes made to a site over time.
For instance:
- domain.com/about/ updated and 301 redirected to:
- domain.com/about-us/ updated and 301 redirected to:
- domain.com/about-our-company/ updated and 301 redirected to:
- domain.com/company-history/
Now anyone trying to access the original page will get redirected not once but three times.
I like to use Ahrefs Site Audit to find redirect chains. After crawling your site, it will identify the number of redirect chain issues you have (along with other errors).
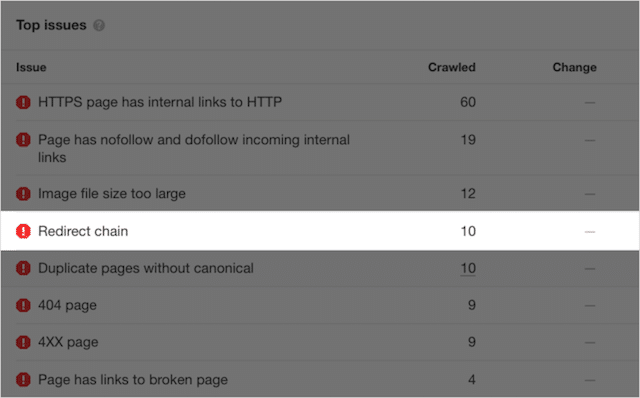
You can drill into the list of redirect chains to see the chains that occur:
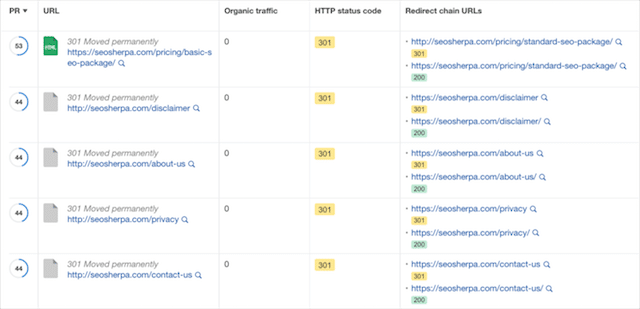
To fix each chain, update the 301 redirects at the origin URL with an absolute link to the final destination – thus removing the chain of redirects in the middle.
(13). Eliminate 404 Errors
It happens!
Files get moved (or go missing), and links go broken.

When this occurs, users will experience longer page loading times due to additional web server requests to find the missing files.
Eventually, leading to a 404 error.
The causes of these errors are numerous and inconsequential.
All you need to know is how to find them:
One way is to use Google Search Console to find and repair them.
Once logged in to your GSC account, click on Coverage and then Error.
Click on Submitted URL not found, and you will see a list of all the links resulting in the 404 error:
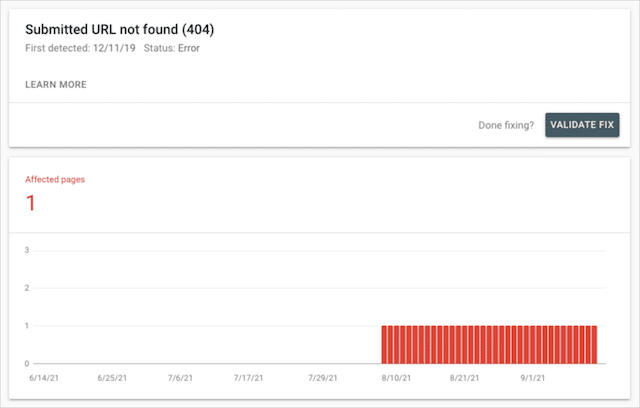
Alternatively, you can use a site audit tool like Ahrefs or Screaming Frog.
Whatever tool you use, know that you need to identify links to 404 pages and media files.
Then replace or remove those broken links.
Doing so will speed up your site.
(14). Cutback, Update and Upgrade – Three Steps to Improve Your Page Speed with Plugins
When it comes to plugins and extensions, the fewer the better.
Most add-ons load JavaScript and CSS.
And, as I already pointed out these two things can put your website in go-slow mode.
So, wherever possible, I recommend you strip back your plugins and use ONLY what’s (absolutely) essential.
Anything, that isn’t necessary for your site’s functionality turn off and then delete.
Of course, some plugins affect site speed more than others.
So even if you absolutely need a plugin, there may be a faster alternative.
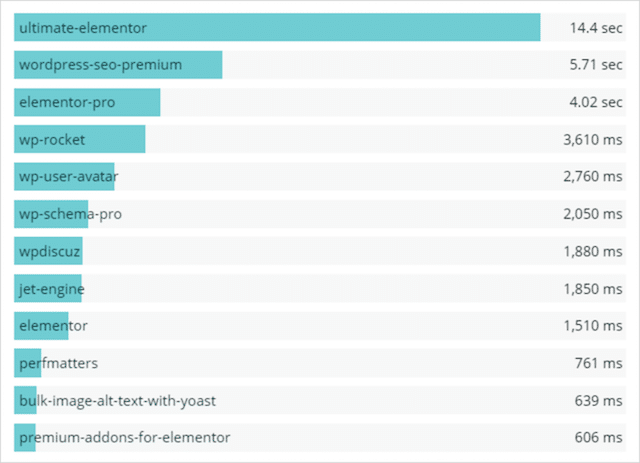
This post by ServeBolt lists the WordPress plugins most affecting load time performance – and lists better, faster options.
You should make the switch if you find quicker alternatives.
The third step in speeding up your website via plugins is to ensure you are running the latest plugin versions.
Very often, older plugins have incompatibilities with the current version of WordPress or PHP.
These incompatibilities almost always impact page speed performance.
Thankfully, the plugin menu in WordPress makes it easy to spot outdated plugins:
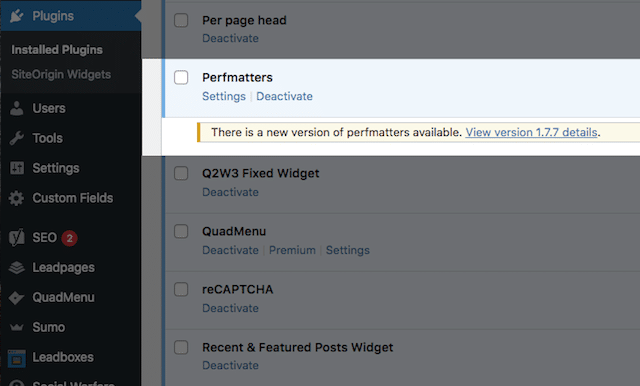
From there, you can simply upgrade to the latest version.
(15). Use This Little Known Google Tag Manager Trick to Speed up Your Website
You’ve probably heard of Google Tag Manager? And, hopefully, you are using it on your website.
Google Tag Manager is a container for all your pixels and tracking scripts, which makes deploying codes simple – and bypasses the need for a developer.
Simply moving your tracking pixels from embedded in your website code to Google Tag Manager can shave up to 2 seconds off your load time.
This is a great page speed improvement, but it doesn’t stop there…
Did you know that Google Tag Manager, allows you to control when your tags are fired and thus speed up your load times even further?
As you’ve learned already, any code that’s not required for a fast largest contentful paint should be delayed until after the main content has loaded.
By default, Google Tag Manager will fire your tags on page view.

But, by selecting the ‘Window Loaded” trigger your tags are fired once the entire content of the page has been fully loaded, including any embedded resources such as images and scripts.
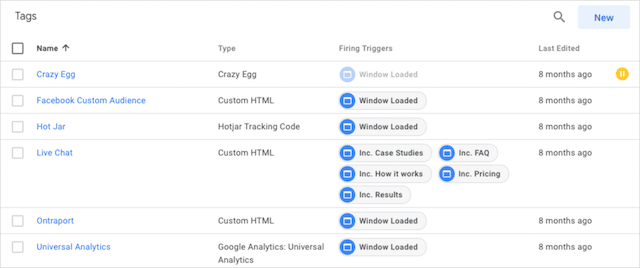
I set this up on the SEO Sherpa website, and because I have a bunch of tracking set up, it boosted load times significantly.
To implement this page speed trick on your own website, login to GTM and select ‘New Trigger’ and then ‘Window Loaded.’
And once you’ve done that, you’re done.
Final Thought: Speed Is a Trust Signal
Page speed is no longer a technical nice-to-have.
It is a signal of quality.
Fast pages get crawled more efficiently, convert better, and are more likely to be trusted by users and search systems alike. Slow pages quietly lose visibility — not because they are irrelevant, but because they create friction.
Most performance issues don’t come from one obvious mistake.
They come from small inefficiencies spread across design, development, content, and infrastructure.
And fixing them in isolation rarely solves the real problem.
If you’re unsure whether page speed is limiting your visibility, conversions, or AI-driven search performance — or how it fits into a wider Search Everywhere Optimization™ strategy — clarity starts with understanding where friction actually lives.
Book a free discovery call with SEO Sherpa and we’ll help you identify what’s holding your site back, what matters most to fix, and how performance fits into a system built for modern search.







Leave a Reply